Difference between revisions of "Eyetrackers"
| (57 intermediate revisions by 4 users not shown) | |||
| Line 1: | Line 1: | ||
== SR Research == | == SR Research == | ||
| − | [[image:SR_logo.jpg | | + | [[image:SR_logo.jpg | right |150px]] |
[[File:eyelink.jpg|thumb|200px|SR Research EyeLink II]] | [[File:eyelink.jpg|thumb|200px|SR Research EyeLink II]] | ||
=== EyeLink II === | === EyeLink II === | ||
| + | |||
| + | |||
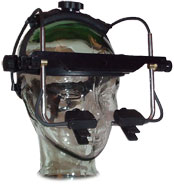
| + | The EyeLink II system consists of three miniature cameras mounted on a padded headband. Two eye cameras allow binocular eye tracking or selection of the subject’s dominant eye. | ||
| + | |||
| + | An optical head-tracking camera integrated into the headband allows accurate tracking of the subject’s point of gaze without the need for a bite bar. | ||
| − | |||
'''Specifications''' | '''Specifications''' | ||
| Line 30: | Line 34: | ||
| + | === EyeLink 1000 === | ||
| + | [[image:Eyelink1000.jpg | right |150px]] | ||
| + | http://www.sr-research.com/eyelink1000.html | ||
| + | |||
| + | The core of the EyeLink 1000 eye tracker consists of a custom designed high-speed camera connected to a dedicated Host computer. Running on a real-time operating system, the Host software provides extremely fast eye sample access with incredibly low inter-sample variability, accessed via a set of programming interfaces for multiple operating systems and programming languages | ||
| + | '''Specifications''' | ||
| + | |||
| + | {| class="wikitable" | ||
| + | |- | ||
| + | ! Eyelink 1000 and Eyelink 1000 Plus | ||
| + | |- | ||
| + | | Sampling Rate || Head Supported: 2000 Hz Monocular / 1000 Hz Binocular | ||
| + | Remote / Head Free: 500 Hz Monocular | ||
| + | |- | ||
| + | | Accuracy || Head Supported: 0.25º -0.5º average accuracy | ||
| + | Remote / Head Free: 0.5º average accuracy | ||
| + | |- | ||
| + | | Real-time Data Access || Head Supported: 1.4 msec (SD < 0.4 msec) @ 2000 Hz | ||
| + | Remote / Head Free: 3 msec (SD < 1.2 msec) @ 500 Hz | ||
| + | |- | ||
| + | | Participant Setup || Very simple and easy. Typically less than 2-5 minutes | ||
| + | |- | ||
| + | | Resolution || Head Supported: 0.01º RMS, micro-saccade resolution of 0.05º | ||
| + | Remote / Head Free:0.05º RMS, saccade resolution of 0.25 | ||
| + | |} | ||
| + | Full specifications: http://www.sr-research.com/pdf/techspec.pdf<br /> | ||
| + | |||
| + | [[Eyelink_1000_calibration | Matlab calibration example]] | ||
| + | |||
| + | [[Eyelink1000plussetup|Eyelink 1000 plus setup]] | ||
| + | |||
| + | Here is a '''tutorial video''' on how to '''setup Eyelink with a participant''': [https://www.youtube.com/watch?v=O3z8I5y_l5E&list=PLOdF-B36TwspxRQeam0u5Yd29wOjUWcel&index=7 Eyelink setup and calibration tutorial video.] | ||
| + | |||
| + | From the SR-Research support forum, about '''placement of monitor, camera and participant''': | ||
| + | |||
| + | ''Ideally, the Desktop mount should be placed between 50-70 cm from the participant's eyes and be centrally aligned with the Display monitor from the participant's perspective. When using a wide screen monitor it will need to be sufficiently far away from the participant that it fits within the trackable range of the system. As a rule of thumb it will need to be at a distance at least 1.75 times its width (so a 40 cm wide monitor would need to be at least 70 cm away). As widescreen monitors are typically around 50 cm wide, they will need to be placed at least 90 cm away. This means that, in order for the camera to be placed correctly (50-70 cm from the participant's eyes) it will need to be brought forward from the monitor 20-30 cm.'' | ||
| + | |||
| + | ''The top of the EyeLink camera and illuminator should also be as high as possible in the participant's field of view without obstructing any part of the display.'' | ||
| + | |||
| + | {| class="wikitable" | ||
| + | |- | ||
| + | |[[File:EyelinkParticipantSetup.jpg|frame|FAQ: What is the ideal configuration EyeLink 1000 / EyeLink 1000 Plus Desktop mount? Original is here on the sr-support forum (need to sign-in): https://www.sr-support.com/showthread.php?tid=206]] | ||
| + | |} | ||
| + | |||
| + | The original image is from the sr-research support forum. It is found [https://www.sr-support.com/showthread.php?tid=206 here (sign in needed).] | ||
== Tobii == | == Tobii == | ||
| + | [[File:tobii_logo.jpg | right]] | ||
[[File:Tobii.jpg|thumb|200px|Tobii T60]] | [[File:Tobii.jpg|thumb|200px|Tobii T60]] | ||
[[File:TX300.png|thumb|250px|Tobii TX300]] | [[File:TX300.png|thumb|250px|Tobii TX300]] | ||
| + | |||
| + | |||
===Tobii T60/T120=== | ===Tobii T60/T120=== | ||
| Line 44: | Line 96: | ||
There is a Tobii setup in the babylab, which is in a fixed lab setup. | There is a Tobii setup in the babylab, which is in a fixed lab setup. | ||
| − | There are also two mobile Tobii setups. Please contact | + | There are also two mobile Tobii setups. Please contact [mailto:g.lange@psych.ru.nl Gero Lange] for booking requests. Please keep in mind that these mobile setups are booked _without_ a room. If you plan to use these eyetrackers, make sure to also book a room that can be locked. You can use it in a cubicle, as long as you make sure that the eyetracker is stored in a locked room at the end of the day. |
'''Lab setup''' | '''Lab setup''' | ||
| Line 85: | Line 137: | ||
Presentation plugin, including documentation on how to install and how to use it: | Presentation plugin, including documentation on how to install and how to use it: | ||
| − | + | https://www.fh-joanneum.at/en/projekt/visionspace-wahrnehmungslabor/ | |
| − | |||
| − | |||
'''Downloads''' | '''Downloads''' | ||
| Line 94: | Line 144: | ||
*[[Media:Getting_a_Tobii_Eye_Tracker_to_Work.pdf|Getting Started Guide]] | *[[Media:Getting_a_Tobii_Eye_Tracker_to_Work.pdf|Getting Started Guide]] | ||
| − | *[[Media:TobiiEyetrackerExtension_1_1.zip| | + | *[[Media:TobiiEyetrackerExtension_1_1.zip|Tobii Eyetrackers Extension for use with Presentation (including samples and documentation) (zip)]] |
| + | |||
| + | *[https://www.fh-joanneum.at/en/projekt/visionspace-wahrnehmungslabor/ Neurobs Presentation plugin & documentation] | ||
| + | |||
| + | '''Lab setup''' | ||
| + | |||
| + | http://tsgdoc.socsci.ru.nl/index.php?title=Tobii_Eye_Tracker | ||
| + | |||
| + | ===Tobii TX300=== | ||
| + | |||
| + | |||
| + | '''Specifications''' | ||
| + | |||
| + | {| class="wikitable" | ||
| + | |- | ||
| + | ! scope="col" style="width:200px;"| | ||
| + | ! scope="col" style="width:200px;"| Tobii TX300 Eye Tracker<sup>1</sup> | ||
| + | |- | ||
| + | | Precision(degrees) || < 0.1 | ||
| + | |- | ||
| + | | Accuracy (degrees) || 0.5 (Monocular), 0.4 (Binocular) | ||
| + | |- | ||
| + | | Freedom of Head Movement (cm) || 37 * 17 (at 65 cm distance) | ||
| + | |- | ||
| + | | Data Rate (Hz) || 60Hz, 120Hz or 300Hz | ||
| + | |- | ||
| + | | Binocular Tracking || style="background-color:#9F9;" | Yes | ||
| + | |- | ||
| + | | Display Size (inch) || 23 | ||
| + | |- | ||
| + | | Display Resolution (px) || 1920 * 1080 (max 60Hz) | ||
| + | |- | ||
| + | | Tracking method || Dark Pupil Tracking | ||
| + | |- | ||
| + | | Eye Tracking Server || Embedded | ||
| + | |- | ||
| + | | User Camera || Built-in (640x480@30fps) | ||
| + | |- | ||
| + | | Audio || Built-in Speakers (3W) | ||
| + | |} | ||
| − | |||
== SensoMotoric Instruments (SMI) == | == SensoMotoric Instruments (SMI) == | ||
| − | + | [[image:SMI_logo.jpg |right]] | |
[[File:IViewXRED.jpg|thumb|200px|SMI RED500]] | [[File:IViewXRED.jpg|thumb|200px|SMI RED500]] | ||
[[file:eyeviewx.jpg |thumb|200px|SMI iView X]] | [[file:eyeviewx.jpg |thumb|200px|SMI iView X]] | ||
=== SMI RED500 === | === SMI RED500 === | ||
| + | |||
| + | [[SMI RED 500 Eye Tracker (DCC)|How to connect SMI RED 500 eyetracker (Scheme)]] | ||
| + | |||
'''Downloads''' | '''Downloads''' | ||
| Line 110: | Line 201: | ||
*[[Media:Eye-tracking_Presentation_iview.zip | Presentation Extension (zip)]] | *[[Media:Eye-tracking_Presentation_iview.zip | Presentation Extension (zip)]] | ||
| − | *[[Media: | + | *[[Media:SMI-Eyetracker-Example.zip|Example Presentation Script (zip, new script since 2018-06-05)]] An example script that connects and communicates with the IViewX program. It shows two pictures side by side. Data can be analysed using BeGaze. There are a lot of explanations in the files. The comments will help understanding how to use an SMI eyetracker in Presentation. |
| + | Source code: [https://gitlab.socsci.ru.nl/h.voogd/SMI-Eyetracking-Example/blob/master/SMI-Eyetracker-Example.sce SMI-Eyetracker-Example.sce ], [https://gitlab.socsci.ru.nl/h.voogd/SMI-Eyetracking-Example/blob/master/SMI-Eyetracker-ExampleINFO.pcl SMI-Eyetracker-ExampleINFO.pcl] [https://gitlab.socsci.ru.nl/h.voogd/SMI-Eyetracking-Example/blob/master/SMI-Eyetracker-ExamplePCL.pcl SMI-Eyetracker-ExamplePCL.pcl] [https://gitlab.socsci.ru.nl/h.voogd/SMI-Eyetracking-Example/blob/master/SMI-Eyetracker-ExampleSUBS.pcl SMI-Eyetracker-ExampleSUBS.pcl] | ||
*[[Media:Python.zip|Python Script (zip)]] | *[[Media:Python.zip|Python Script (zip)]] | ||
| − | |||
=== iView X === | === iView X === | ||
| Line 122: | Line 213: | ||
*[[Media:Eye-tracking_Presentation_iview.zip | Presentation Extension (zip)]] | *[[Media:Eye-tracking_Presentation_iview.zip | Presentation Extension (zip)]] | ||
| − | + | *[[Media:SMI-Eyetracker-Example.zip|Example Presentation Script (zip, new script since 2018-06-05)]] An example script that connects and communicates with the IViewX program. It shows two pictures side by side. Data can be analysed using BeGaze. There are a lot of explanations in the files. The comments will help understanding how to use an SMI eyetracker in Presentation. | |
| − | *[[Media: | + | Source code: [https://gitlab.socsci.ru.nl/h.voogd/SMI-Eyetracking-Example/blob/master/SMI-Eyetracker-Example.sce SMI-Eyetracker-Example.sce ], [https://gitlab.socsci.ru.nl/h.voogd/SMI-Eyetracking-Example/blob/master/SMI-Eyetracker-ExampleINFO.pcl SMI-Eyetracker-ExampleINFO.pcl] [https://gitlab.socsci.ru.nl/h.voogd/SMI-Eyetracking-Example/blob/master/SMI-Eyetracker-ExamplePCL.pcl SMI-Eyetracker-ExamplePCL.pcl] [https://gitlab.socsci.ru.nl/h.voogd/SMI-Eyetracking-Example/blob/master/SMI-Eyetracker-ExampleSUBS.pcl SMI-Eyetracker-ExampleSUBS.pcl] |
*[[Media:Python.zip|Python Script (zip)]] | *[[Media:Python.zip|Python Script (zip)]] | ||
Latest revision as of 13:32, 9 January 2023
SR Research
EyeLink II
The EyeLink II system consists of three miniature cameras mounted on a padded headband. Two eye cameras allow binocular eye tracking or selection of the subject’s dominant eye.
An optical head-tracking camera integrated into the headband allows accurate tracking of the subject’s point of gaze without the need for a bite bar.
Specifications
| EyeLink II |
|---|
| 500 Hz binocular eye monitoring |
| 0.5º average accuracy |
| Access eye position data with 3.0 msec delay |
| 0.01º RMS resolution |
| High quality computer based or scene camera eye tracking |
| Fast and simple participant setup, calibration, and validation |
EyeLink 1000
http://www.sr-research.com/eyelink1000.html
The core of the EyeLink 1000 eye tracker consists of a custom designed high-speed camera connected to a dedicated Host computer. Running on a real-time operating system, the Host software provides extremely fast eye sample access with incredibly low inter-sample variability, accessed via a set of programming interfaces for multiple operating systems and programming languages
Specifications
| Eyelink 1000 and Eyelink 1000 Plus | |
|---|---|
| Sampling Rate | Head Supported: 2000 Hz Monocular / 1000 Hz Binocular
Remote / Head Free: 500 Hz Monocular |
| Accuracy | Head Supported: 0.25º -0.5º average accuracy
Remote / Head Free: 0.5º average accuracy |
| Real-time Data Access | Head Supported: 1.4 msec (SD < 0.4 msec) @ 2000 Hz
Remote / Head Free: 3 msec (SD < 1.2 msec) @ 500 Hz |
| Participant Setup | Very simple and easy. Typically less than 2-5 minutes |
| Resolution | Head Supported: 0.01º RMS, micro-saccade resolution of 0.05º
Remote / Head Free:0.05º RMS, saccade resolution of 0.25 |
Full specifications: http://www.sr-research.com/pdf/techspec.pdf
Here is a tutorial video on how to setup Eyelink with a participant: Eyelink setup and calibration tutorial video.
From the SR-Research support forum, about placement of monitor, camera and participant:
Ideally, the Desktop mount should be placed between 50-70 cm from the participant's eyes and be centrally aligned with the Display monitor from the participant's perspective. When using a wide screen monitor it will need to be sufficiently far away from the participant that it fits within the trackable range of the system. As a rule of thumb it will need to be at a distance at least 1.75 times its width (so a 40 cm wide monitor would need to be at least 70 cm away). As widescreen monitors are typically around 50 cm wide, they will need to be placed at least 90 cm away. This means that, in order for the camera to be placed correctly (50-70 cm from the participant's eyes) it will need to be brought forward from the monitor 20-30 cm.
The top of the EyeLink camera and illuminator should also be as high as possible in the participant's field of view without obstructing any part of the display.
 FAQ: What is the ideal configuration EyeLink 1000 / EyeLink 1000 Plus Desktop mount? Original is here on the sr-support forum (need to sign-in): https://www.sr-support.com/showthread.php?tid=206 |
The original image is from the sr-research support forum. It is found here (sign in needed).
Tobii
Tobii T60/T120
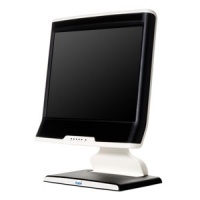
The Tobii T60 and T120 Eye Trackers are integrated into a 17" TFT monitor. They are ideal for all forms of eye tracking studies using screen based stimuli.
There is a Tobii setup in the babylab, which is in a fixed lab setup.
There are also two mobile Tobii setups. Please contact Gero Lange for booking requests. Please keep in mind that these mobile setups are booked _without_ a room. If you plan to use these eyetrackers, make sure to also book a room that can be locked. You can use it in a cubicle, as long as you make sure that the eyetracker is stored in a locked room at the end of the day.
Lab setup
http://tsgdoc.socsci.ru.nl/index.php?title=Tobii_Eye_Tracker
Specifications
| Tobii T60 Eye Tracker | Tobii T120 Eye Tracker1 | |
|---|---|---|
| Accuracy (degrees) | 0.5 | 0.5 |
| Drift (degrees) | < 0.3 | < 0.3 |
| Freedom of Head Movement (cm) | 44 * 22 * 30 | 30 * 22 * 30 |
| Data Rate (Hz) | 60 | 120 |
| Binocular Tracking | Yes | Yes |
| Display Size (inch) | 17 | 17 |
| Display Resolution (px) | 1280 * 1024 | 1280 * 1024 |
| Bright/Dark Pupil Tracking | Both - automatic optimization | Both - automatic optimization |
| Eye Tracking Server | Embedded | Embedded |
| User Camera | Built-in | Built-in |
| Audio | Built-in Speakers | Built-in Speakers |
1The Tobii T120 Eye Tracker can also run in T60 mode with full head movement box
Presentation plugin, including documentation on how to install and how to use it:
https://www.fh-joanneum.at/en/projekt/visionspace-wahrnehmungslabor/
Downloads
Lab setup
http://tsgdoc.socsci.ru.nl/index.php?title=Tobii_Eye_Tracker
Tobii TX300
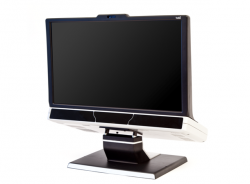
Specifications
| Tobii TX300 Eye Tracker1 | |
|---|---|
| Precision(degrees) | < 0.1 |
| Accuracy (degrees) | 0.5 (Monocular), 0.4 (Binocular) |
| Freedom of Head Movement (cm) | 37 * 17 (at 65 cm distance) |
| Data Rate (Hz) | 60Hz, 120Hz or 300Hz |
| Binocular Tracking | Yes |
| Display Size (inch) | 23 |
| Display Resolution (px) | 1920 * 1080 (max 60Hz) |
| Tracking method | Dark Pupil Tracking |
| Eye Tracking Server | Embedded |
| User Camera | Built-in (640x480@30fps) |
| Audio | Built-in Speakers (3W) |
SensoMotoric Instruments (SMI)
SMI RED500
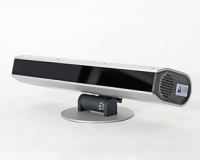
How to connect SMI RED 500 eyetracker (Scheme)
Downloads
- Example Presentation Script (zip, new script since 2018-06-05) An example script that connects and communicates with the IViewX program. It shows two pictures side by side. Data can be analysed using BeGaze. There are a lot of explanations in the files. The comments will help understanding how to use an SMI eyetracker in Presentation.
Source code: SMI-Eyetracker-Example.sce , SMI-Eyetracker-ExampleINFO.pcl SMI-Eyetracker-ExamplePCL.pcl SMI-Eyetracker-ExampleSUBS.pcl
iView X
Downloads
- Presentation Extension (zip)
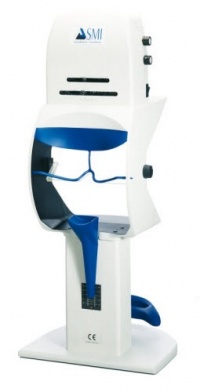
- Example Presentation Script (zip, new script since 2018-06-05) An example script that connects and communicates with the IViewX program. It shows two pictures side by side. Data can be analysed using BeGaze. There are a lot of explanations in the files. The comments will help understanding how to use an SMI eyetracker in Presentation.
Source code: SMI-Eyetracker-Example.sce , SMI-Eyetracker-ExampleINFO.pcl SMI-Eyetracker-ExamplePCL.pcl SMI-Eyetracker-ExampleSUBS.pcl
