Difference between revisions of "Behringer X-Air XR18"
(link to software) |
|||
| (3 intermediate revisions by the same user not shown) | |||
| Line 1: | Line 1: | ||
| − | + | {{Infobox tsg | |
| + | | name = Behringer X-Air XR18 | ||
| + | | image = XR18-large.jpg | ||
| + | | caption = Behringer X-Air XR18 | ||
| + | | downloads = {{bulleted list | ||
| + | | [https://gitlab.socsci.ru.nl/wilberth/beer 'Beer' (custom simplified interface)] | ||
| + | | [[Media:X-AIR-Edit_PC_V1.5.zip|X-AIR-Edit v1.5 (Win)]] | ||
| + | }} | ||
| + | | manuals = {{bulleted list | ||
| + | | [[Media:Beer_Audio.pdf|User Manual (TSG)]] | ||
| + | | [https://www.music-group.com/Categories/Behringer/Mixers/Digital-Mixers/XR18/p/P0BI8/downloads X-Air Edit documentation] | ||
| + | }} | ||
| + | }} | ||
| − | The Behringer X-Air XR18 is | + | The Behringer X-Air XR18 is a digital mixer and multi-channel audio interface. It gives the user a high level of control over all audio in- and outputs during an experiment. |
| − | + | <!-- Table of Contents will be generated here --> | |
| − | |||
| − | |||
| − | + | ==Specifications== | |
| − | |||
| − | + | ==Installation== | |
| − | + | The XR18 audio mixers placed in the labs are fully pre-installed and ready to go. The following steps only serve as reference for new or mobile setups. | |
| − | + | === Connection === | |
| − | + | The XR18 communicates with its digital interface via Ethernet, either wired or wireless. We offer several solutions for wired connections as described below, but recommend the first one. | |
| − | The | ||
| − | === Connection === | + | ==== Connection with hub, DHCP Server ==== |
| − | + | [[File:Behringer dhcp server.png|thumb|320px|X-Air Edit connection settings when used with the [[Kensington UH3000-e]] hub.]] | |
| − | + | Here described is a connection with the [[Kensington UH3000-e]] hub. | |
| − | |||
| − | Here described is a connection with the Kensington UH3000-e hub. | ||
Make sure the connection of the Behringer is set to 'DHCP Server'. | Make sure the connection of the Behringer is set to 'DHCP Server'. | ||
If it is not, use the second connection method to change the setting. | If it is not, use the second connection method to change the setting. | ||
| − | |||
Now connect the Kensington hub to a USB port on the computer. Preferably use a USB3 port (these ports are marked 'ss' and/or have a blue inside like the ports on the hub itself). | Now connect the Kensington hub to a USB port on the computer. Preferably use a USB3 port (these ports are marked 'ss' and/or have a blue inside like the ports on the hub itself). | ||
| − | Connect the Kensington hub to the Behringer | + | Connect the Kensington hub to the Behringer XR18 with an ethernet (RJ45/8p8c) cable. Use the port that is marked 'remote' on the XR18. The cable will also fit in the port marked |
| − | 'ultranet' but this will not do. | + | 'ultranet', but this will not do. |
| − | |||
| − | Additionally you may want to connect the hub with the | + | Additionally you may want to connect the hub with the XR18 with a USB2-AB cable. This is not necessary for controlling the mixer, but additional functionality becomes available if you do. |
| − | Make sure the switch on the | + | Make sure the switch on the XR18 is set to 'ethernet'. |
Your can now start the software. | Your can now start the software. | ||
| − | ==== | + | ==== Connection without hub, DHCP ==== |
| − | Connect both your computer and the | + | Connect both your computer and the XR18 to a ethernet (RJ45/8p8c) wall outlet. Make sure the connection is set to 'DHCP'. |
| − | The is the default. The | + | The is the default. The XR18 will revert to this setting if you press the reset button for 2 seconds. |
| − | Make sure the switch on the | + | Make sure the switch on the XR18 is set to 'ethernet'. |
Your can now start the software. | Your can now start the software. | ||
| + | |||
| + | ==Interface== | ||
| + | The TSG has developed a custom, simplified interface for controlling the XR18 mixer called 'Beer'. This program can be found in the start menu on our lab computers (Start\All Programs\Behringer). | ||
| + | If you require more controls and options, you can use the official Behringer 'X-Air-Edit' program. | ||
| + | |||
| + | ===Beer=== | ||
| + | [[File:Screenshot from 2017-03-07 09-53-44.png|thumb|320px|Beer, simplified control interface for the XR18.]] | ||
| + | Beer shows the audio sources (microphone 1, microphone 2, PC output) where the sound comes from on the bottom, and to the right are the outputs | ||
| + | (phones 1, PC input, phones 2, speakers, monitor), i.e. where the sound goes to. The grid in between shows what is connected to what. | ||
| + | |||
| + | In the example on the right, sound goes from the first microphone to the first set of headphones. The experiment leader can use | ||
| + | his own set of headphones to listen in on what the participant is hearing (monitor: phones 1). | ||
| + | |||
| + | Press 'get ip' to query where the XR18 is. Then press 'use' to use this device. You can also type the address manually if you want, which is unlikely. | ||
| + | |||
| + | The software is available for on [https://gitlab.socsci.ru.nl/wilberth/beer our git server.] | ||
| + | You can download a more comprehensive manual [[Media:Beer_Audio.pdf|here]]. | ||
| + | |||
| + | ===X-Air Edit=== | ||
| + | If you require a more elaborate setup than the simple Beer interface can provide, please consult the TSG or the [https://www.music-group.com/Categories/Behringer/Mixers/Digital-Mixers/XR18/p/P0BI8/downloads official X-Air Edit documentation]. | ||
| + | |||
| + | <!-- ==References== | ||
| + | <references /> --> | ||
| + | |||
| + | ==External Links== <!-- Optional --> | ||
| + | *[https://www.music-group.com/Categories/Behringer/Mixers/Digital-Mixers/XR18/p/P0BI8 Official product page] | ||
Latest revision as of 17:33, 14 November 2019
 Behringer X-Air XR18 | |
| Downloads | |
|---|---|
| Manuals | |
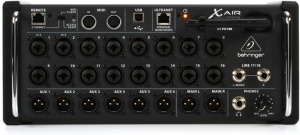
The Behringer X-Air XR18 is a digital mixer and multi-channel audio interface. It gives the user a high level of control over all audio in- and outputs during an experiment.
Specifications
Installation
The XR18 audio mixers placed in the labs are fully pre-installed and ready to go. The following steps only serve as reference for new or mobile setups.
Connection
The XR18 communicates with its digital interface via Ethernet, either wired or wireless. We offer several solutions for wired connections as described below, but recommend the first one.
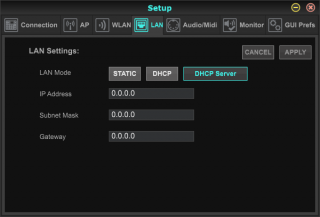
Connection with hub, DHCP Server

Here described is a connection with the Kensington UH3000-e hub.
Make sure the connection of the Behringer is set to 'DHCP Server'. If it is not, use the second connection method to change the setting.
Now connect the Kensington hub to a USB port on the computer. Preferably use a USB3 port (these ports are marked 'ss' and/or have a blue inside like the ports on the hub itself). Connect the Kensington hub to the Behringer XR18 with an ethernet (RJ45/8p8c) cable. Use the port that is marked 'remote' on the XR18. The cable will also fit in the port marked 'ultranet', but this will not do.
Additionally you may want to connect the hub with the XR18 with a USB2-AB cable. This is not necessary for controlling the mixer, but additional functionality becomes available if you do.
Make sure the switch on the XR18 is set to 'ethernet'.
Your can now start the software.
Connection without hub, DHCP
Connect both your computer and the XR18 to a ethernet (RJ45/8p8c) wall outlet. Make sure the connection is set to 'DHCP'. The is the default. The XR18 will revert to this setting if you press the reset button for 2 seconds.
Make sure the switch on the XR18 is set to 'ethernet'.
Your can now start the software.
Interface
The TSG has developed a custom, simplified interface for controlling the XR18 mixer called 'Beer'. This program can be found in the start menu on our lab computers (Start\All Programs\Behringer). If you require more controls and options, you can use the official Behringer 'X-Air-Edit' program.
Beer
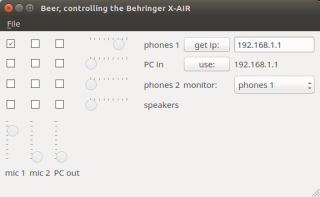
Beer shows the audio sources (microphone 1, microphone 2, PC output) where the sound comes from on the bottom, and to the right are the outputs (phones 1, PC input, phones 2, speakers, monitor), i.e. where the sound goes to. The grid in between shows what is connected to what.
In the example on the right, sound goes from the first microphone to the first set of headphones. The experiment leader can use his own set of headphones to listen in on what the participant is hearing (monitor: phones 1).
Press 'get ip' to query where the XR18 is. Then press 'use' to use this device. You can also type the address manually if you want, which is unlikely.
The software is available for on our git server. You can download a more comprehensive manual here.
X-Air Edit
If you require a more elaborate setup than the simple Beer interface can provide, please consult the TSG or the official X-Air Edit documentation.
