BrainStreamExampleSpellerIntro
Example 2: Visual speller
Introduction
In this example, we will show how to create a visual speller in BrainStream.
The visual speller
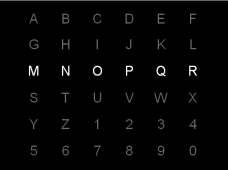
The visual speller was first described by Farwell and Donchin in 1988 1. A visual speller consists of a matrix which usually contains all the letters of the alphabet.
Figure 1: Visual speller
The rows and columns of this matrix are intensified in random order by briefly increasing the luminance of all elements within a row or column, which is perceived as a flash. Subjects are asked to direct their attention to one of the elements of the matrix. They can do this by counting how many times the target element flashes. As a result, the brain response to a flash of a row or column containing the target character is different from the brain response to other rows and columns. After a sequence of stimuli, in which all rows and columns are flashed several times, a classifier can be trained to distinguish between brain responses to attended and unattended characters. Thus, subjects are able to select elements from the matrix by directing their attention to this element.
The visual speller that we are going to build in this example will be a 3x3 matrix containing the numbers 1 to 9.
The experiment
This visual speller experiment will consist of three parts. First, we must collect data which can be used to train the classifier. We will call this block the Train block. Subsequently, we must use the data we collected during the first block to train the classifier. The second block will be called the Classify block. Finally, we can use the classifier for actually selecting numbers. This is called the Test block. In this example, we will focus on the Train block.
Parts of this example
This example consists of five parts. In each consecutive step, we will use another feature of BrainStream to increase the performance of the speller.
- In the first part, we will build a simple speller. In this example, the stimulus sequence will be determined at the start of the experiment and cannot be changed later on.
- In the second part, we will create a dynamic stimulus sequence. This means that during the experiment, the stimulus sequence may be adapted.
- In the third part, we will direct the presentation of stimuli to a [.DocsSectionsParallelMode#SecClients client].
- In the fourth part, a simple loop function will be used for stimulus presentation. This loop cannot be interrupted by BrainStream.
- In the final part, we will use a looptick function for stimulus presentation. This allows BrainStream to interrupt the stimulus presentation when necessary.
---
[1] Farwell, L.A. & Donchin, E. (1988). Talking off the top of your head: toward a mental prosthesis utilizing event-related brain potentials. Electroencephalography and clinical Neurophysiology, 70, 510-523.
