Difference between revisions of "Plux biosignals"
Jump to navigation
Jump to search
| Line 8: | Line 8: | ||
# Connect Plux to OpenSignals: Click the “Connect” button in the middle of the OpenSignals interface. If your Plux device is properly connected, it will appear in the list of available devices. Select your Plux device and find the properties.<br>[[image:pluxfound.jpg| 400px ]] | # Connect Plux to OpenSignals: Click the “Connect” button in the middle of the OpenSignals interface. If your Plux device is properly connected, it will appear in the list of available devices. Select your Plux device and find the properties.<br>[[image:pluxfound.jpg| 400px ]] | ||
# Configure the acquisition settings: In the OpenSignals interface, click on the “Acquisition” tab to configure the acquisition settings. Choose the type of signal you want to acquire (e.g., ECG, EMG, EEG, etc.), the sampling rate, and the number of channels you want to record. You can also adjust the signal amplification and filter settings. | # Configure the acquisition settings: In the OpenSignals interface, click on the “Acquisition” tab to configure the acquisition settings. Choose the type of signal you want to acquire (e.g., ECG, EMG, EEG, etc.), the sampling rate, and the number of channels you want to record. You can also adjust the signal amplification and filter settings. | ||
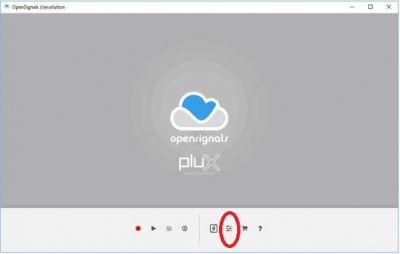
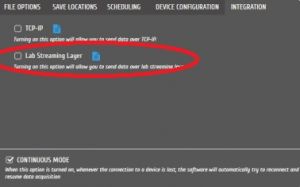
| − | # Configure LSL settings: In the OpenSignals interface, click on the “Acquisition” tab and select “LSL” from the drop-down menu under “Connection.” Configure the LSL settings, including the stream name, stream type, and channel information.<br>[[image:pluxAcquisition.jpg| 400px ]] | + | # Configure LSL settings: In the OpenSignals interface, click on the “Acquisition” tab and select “LSL” from the drop-down menu under “Connection.” Configure the LSL settings, including the stream name, stream type, and channel information.<br>[[image:pluxAcquisition.jpg| 400px ]] [[image:pluxLSL.jpg| 300px ]] |
# Start the acquisition: After configuring the acquisition and LSL settings, click the “Start” button on the bottom right corner of the OpenSignals interface. The software will start recording data from the Plux device and streaming it using the LSL protocol. | # Start the acquisition: After configuring the acquisition and LSL settings, click the “Start” button on the bottom right corner of the OpenSignals interface. The software will start recording data from the Plux device and streaming it using the LSL protocol. | ||
# Receive LSL data in other applications: You can use other applications that support LSL to receive and analyze the data from Plux. The Lab computers will have the program "LabRecorder" to record lsl streams. | # Receive LSL data in other applications: You can use other applications that support LSL to receive and analyze the data from Plux. The Lab computers will have the program "LabRecorder" to record lsl streams. | ||
# Stop the acquisition: When you’re done recording, click the “Stop” button to stop the acquisition. The data will be automatically saved to your computer in a .txt file format. | # Stop the acquisition: When you’re done recording, click the “Stop” button to stop the acquisition. The data will be automatically saved to your computer in a .txt file format. | ||
# Disconnect Plux from OpenSignals: When you’re finished using Plux with OpenSignals, click the “Disconnect” button on the top left corner of the OpenSignals interface. This will disconnect the Plux device from the software. | # Disconnect Plux from OpenSignals: When you’re finished using Plux with OpenSignals, click the “Disconnect” button on the top left corner of the OpenSignals interface. This will disconnect the Plux device from the software. | ||
Revision as of 13:33, 9 May 2023

Plux is a wireless biosignal acquisition system that allows you to capture and analyze physiological data in real-time. OpenSignals is the software used to manage and process the data acquired with Plux. LabStreamingLayer (LSL) is a framework for synchronizing and streaming time-series data in real-time from multiple sources. LSL provides a standardized communication protocol for transmitting biosignals from Plux to other applications and devices. Here is a step-by-step guide on how to use Plux with LSL:
- Connect the Plux device to your computer: Plug in the USB receiver to your computer and turn on the Plux device by pressing the button on the front. The LED on the button will flash when it is on.
- Launch OpenSignals: OpenSignals is a free, open-source software that can be downloaded from the Plux website. Launch the software on your computer.
- Connect Plux to OpenSignals: Click the “Connect” button in the middle of the OpenSignals interface. If your Plux device is properly connected, it will appear in the list of available devices. Select your Plux device and find the properties.

- Configure the acquisition settings: In the OpenSignals interface, click on the “Acquisition” tab to configure the acquisition settings. Choose the type of signal you want to acquire (e.g., ECG, EMG, EEG, etc.), the sampling rate, and the number of channels you want to record. You can also adjust the signal amplification and filter settings.
- Configure LSL settings: In the OpenSignals interface, click on the “Acquisition” tab and select “LSL” from the drop-down menu under “Connection.” Configure the LSL settings, including the stream name, stream type, and channel information.
- Start the acquisition: After configuring the acquisition and LSL settings, click the “Start” button on the bottom right corner of the OpenSignals interface. The software will start recording data from the Plux device and streaming it using the LSL protocol.
- Receive LSL data in other applications: You can use other applications that support LSL to receive and analyze the data from Plux. The Lab computers will have the program "LabRecorder" to record lsl streams.
- Stop the acquisition: When you’re done recording, click the “Stop” button to stop the acquisition. The data will be automatically saved to your computer in a .txt file format.
- Disconnect Plux from OpenSignals: When you’re finished using Plux with OpenSignals, click the “Disconnect” button on the top left corner of the OpenSignals interface. This will disconnect the Plux device from the software.


