BrainStreamBrainStreamEditor
BrainStream Editor
BrainStream's internal editor can be used to create and test BrainStream projects. The editor shows the experiment definition tables, block files and common block files associated with a project. Changes can be made to any of the files directly from the editor.
Opening the BrainStream Editor
The BrainStream editor can be opened from Matlab with the command bs_editor (make sure that brainstream_mds/core is your current working directory). A popup window appears enabling you to load a saved BrainStream project (.bsp or .exp) from disk. It is recommended not to click any buttons while a project is being loaded. Pressing the Cancel button allows you to choose from a list of recently opened experiment files. If the Cancel button is pressed again, a new project is opened.
Projects can be created, opened and closed via the Projects menu on the menu bar. Clicking on the Windows menu shows a list of all projects that are opened in the BrainStream editor. The currently shown project is indicated with a check mark.
Experiment definition tables are not automatically loaded at startup, because loading tables that you do not want to view takes up unnecessary time. Instead, you can load the tables that you want to view by clicking on them in the Tables section (section number 1, see below). If you want to load a table and all the tables it refers to (see Import-tables), you can place a check mark in the box 'Load referenced tables' above the Tables section.
Sections of the BrainStream Editor
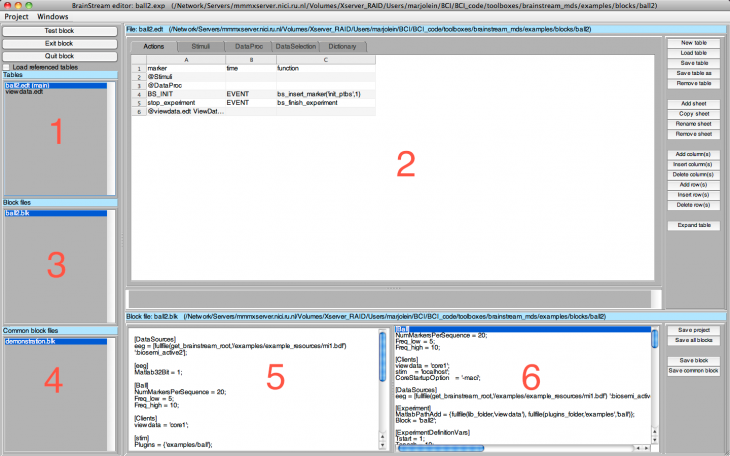
The BrainStream editor consists of several sections which show information about the files associated with the BrainStream project. In the picture of the BrainStream editor below, the different sections are numbered. In the following, each section is discussed in more detail.
The Brain Stream Editor
1. Tables
The Tables section shows a list of all experiment definition tables in the project. The main table is shown at the top of the list. Tables that are used in the current block (the one that is highlighted in the Block files section) are followed by a plus sign. Tables that are unused in the current block are followed by a minus sign.
Clicking on one of the experiment definition tables shows this table in section 2.
2. Experiment definition table
The table section shows the experiment definition table that is highlighted in the Tables section. The name of the table that is currently shown appears in the blue bar above this section. Experiment definition tables can be loaded from disk, saved and removed using the buttons on the right. The ‘Remove table’ option removes the table from the project, but not from disk. The tabs at the top of the table can be used to access the different sheets. Sheets can be added, copied, renamed or removed using the buttons on the right.
The table can be edited using the buttons on the right. Rows and columns can be added after the last row or column using the Add row(s) or Add column(s) buttons. A popup window appears in which the desired number of extra rows or columns can be specified. Rows or columns can also be inserted into the table using Insert row(s) or Insert column(s). In the table, select a cell and press the button. The new row or column will appear above or before the selected cell. In addition, it is possible to insert multiple rows or columns at once. For rows, select in one column the same number of rows that you want to insert. When the Insert row(s) button is clicked, the new rows appear above the selection. For columns, select in one row the same number of columns that you want to insert. The new columns appear before the selected cells.
If one cell is selected, its content will be shown in the grey area under the table. This is useful for cells that contain a lot of text. The content of the cell can be edited either in this grey area or in the cell itself.
The ‘Expand table’ option opens a window showing one table with the combined data from all tables. The expanded table shows the final sequence of actions, the combined marker dictionary and the data selection settings.
More information about the structure of experiment definition tables can be found here.
3. Block files
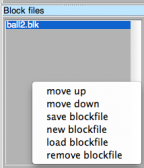
The Block files section shows a list of all block files in the project. Clicking on one of the block files while holding the Ctrl key shows a list of additional options, see figure below. Clicking one of the block files shows the content of this file in section 5.
Options for Block files
4. Common block files
The Common block files section shows a list of all common block files in the project. Clicking on one of the block files while holding the Ctrl key shows a list of options, including the possibility of changing the order of the common block files. If the same setting is defined in more than one common block file, the settings in earlier common block files will be overwritten. Clicking one of the common block files shows the content of this file in section 5.
5. Current (common) block file
When a (common) block file is selected in section 3 or 4, the content of this file is shown here. The blue bar above section 5 shows the name of the selected block file and whether it is a block file or a common block file. Any changes to the block file made here will be incorporated in the next brainstream test run, but they will not be saved automatically. In order to save the changes, click the ‘save block’ or ‘save common block’ button on the right, or left click on the file in area 3 or 4 while holding the Ctrl key and select ‘save blockfile’.
More information about the structure of (common) block files can be found here.
6. Combined current block file and common block files
In this section the combined settings of block files and common block files are shown.
Testing the experiment
In order to test your experiment, press the Test brainstream button in the top left corner. Remember that unsaved changes to the block files and common block files are incorporated in the test run, whereas unsaved changes to the experiment definition tables are ignored.
If you should want to stop you experiment while it is running, you can click the Exit block or Quit block button in the top left corner. Doing so will insert the BS_EXIT or BS_QUIT marker, respectively. Alternatively, you can insert these markers manually (click [.DocsSectionsRunningExperiments#InsertMarkers here] for more information).
Keyboard shortcuts
Cmd+Z can be used in the Experiment Definition table section of the BrainStream editor to undo changes to the table.
Ctrl+O can be used in the Experiment Definition table section of the BrainStream editor. This has different effects depending on what kind of cell is selected in the table:
- selected cell contains a user defined function: Ctrl+O opens this function in the Matlab editor
- selected cell contains the name of a client: Ctrl+O shows this client's IP address
- selected cell contains a reference to a import-table ('@import_table'): Ctrl+O opens the referenced table

