BrainStreamRunningExperiments
Running Experiments
When you have created all the necessary files for your experiment, you can run your experiment via BrainStream's Grapical User Interface (GUI).
Startup of the BrainStream GUI
The BrainStream GUI can be opened from Matlab with the command start_brainstream. If the startup function is used without any input arguments, a popup window will appear containing a list of recently opened experiment files. You can select an experiment from this list or press cancel and select another experiment file via the GUI.
Alternatively, the startup function can be used with one or more input arguments. The settings that can be specified by means of these input arguments can also be selected in the GUI after startup. The following input arguments have to be entered as type 'string'.
start_brainstream(block_file [,path_fnc, bfiles_path, com_bfiles_path])
block_file: filename of a block file (.blk) or BrainStream Project file (.bsp or .exp). Include (relative) path name or make sure it can be found on the Matlab path.
path_fnc (optional): function that handles setting Matlab path. In general, it is recommended to specify this function in the block file (see here) rather than via this input argument.
bfiles_path (optional): starting folder for browsing block files
com_bfiles_path (optional): starting folder for browsing common block files
Using the BrainStream GUI
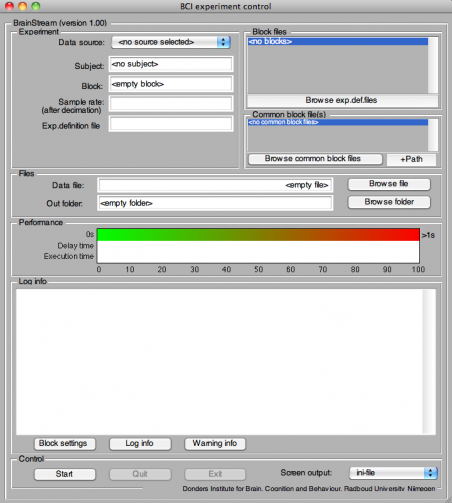
If no block or experiment file is specified during startup of the GUI, the GUI will be empty:
Figure 1: GUI before experiment specification
You can load your experiment files by clicking on the 'Browse exp.def.files' button and selecting your experiment file (.bsp or .exp). All block files and common block files included in this experiment will be loaded. Alternatively, you can add block files and common block files manually (block files via 'Browse exp.def.files' and common block files via 'Browse common block files').
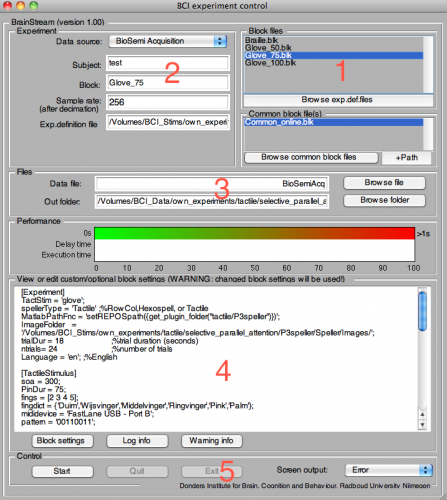
Based on information in the (common) block files, other fields of the GUI will be filled in automatically:
Figure 2: GUI after experiment specification
1. All block files and common block files included in the experiment are listed in the top right part of the GUI. You can select one of the block files by clicking on it. The information in other fields of the GUI shows the settings specified in the currently selected block file.
2. In the Experiment section of the GUI, the datasource, the name of the block, the sample rate and the location of the [[BrainStreamBuildingExperiments#SecExpDef|experiment definition table] are obtained from the block files. A subject's name must be entered manually.
3. Information in the Files section is also automatically obtained from the block files, but can be changed manually by clicking on the buttons on the right. The Out folder is the folder where the recorded data will be saved.
4. The block settings of the selected block file are shown in the bottom part of the GUI, where the can be changed. Note that the changed settings will be used when the experiment is started. In this part of the GUI, you can also view Log info, which shows the Log file of the experiment, and Warning info, which shows a list of warning messages.
5. You can start the experiment by clicking on the Start button at the bottom. You can end the experiment with either the Quit or Exit button. Clicking the Quit button is equivalent to inserting the BS_QUIT marker and clicking the Exit button is equivalent to inserting the BS_EXIT marker (for more information about these markers, click here). In the bottom right corner of the GUI, you can specify the amount of output that is displayed on the screen during the experiment. You can also specify this amount in the block file under topic RunMode and key screenoutputlevel. For more information about the different levels of screen output, click here.
Command window startup (no GUI)
It is also possible to use BrainStream without the GUI. BrainStream can be started from the Matlab command window using the following function:
start_brainstream_nogui(block_file [,subject,user_folders])
block_file: filename of a [.DocsSectionsBuildingExperiments#SecBlock block file] (.blk). Include (relative) path name or make sure it can be found on the Matlab path. If more than one (common) block file is required, specify a cell array of block files in order of relevance (settings of block files that appear earlier in this list will overwrite the same settings specified in subsequently listed block files).
subject (optional): name of the subject (default = 'test')
user_folders (optional): cell array with paths you need for the experiment. If you need several folders on your Matlab path, you can enter them as a cell array.
The following example shows the command for starting the block bci_example1 for a subject called 'subject'. In addition, folders containing code for cap montage and artefact detection are added to the Matlab path:
start_brainstream_nogui('bci_example1.blk','subject',{/Volumes/MyCode/CapMontage,/Volumes/MyCode/EpochArtifacts}).
BrainStream can also be started without the GUI with the function
brainstream_block(blocksettings).
The argument 'blocksettings' needs to be available as a Matlab type structure variable. Topics from the block file become fields of this structure and keys become subfields of these fields. You can obtain the blocksettings in two ways:
- Translate an existing block file into the blocksettings structure using the function blocksettings = bs_get_blockvalue(blockfile), where blockfile is the name of your block file (.blk).
- Manually generate a blocksettings structure. The following example contains the minimally required items to start BrainStream without the GUI:
    blocksettings.DataSources.eeg = 'buffer://localhost:1972:my_device';
    blocksettings.RunMode.Subject = 'a_subjects_name';
    blocksettings.Files.ReferenceFolder = '/Volumes/exps/defs/my_project/';
    blocksettings.Files.ExperimentDefinitionFile = '/Volumes/exps/defs/my_project/my_block.edt';
    blocksettings.Files.OutFolder = '/Volumes/data/my_project/';
    blocksettings.Experiment.Block = 'my_block';
The block settings RunMode.Subject and Files.Referencefolder are only required when BrainStream is started without the GUI. If the GUI is used, these settings are automatically included.
Manually inserting markers during the experiment
You have the option to manually insert markers while your experiment is running. This can be useful in the design and test stages of your experiment, as it allows you to for example trigger or skip the execution of certain functions.
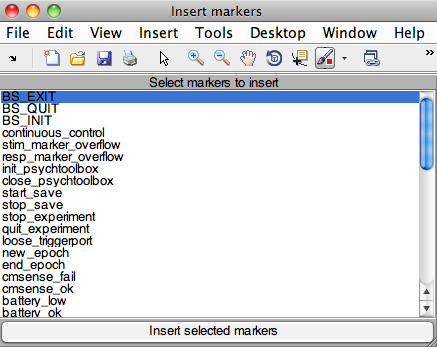
During your experiment, a window will appear containing a list with the names of all markers that are used in your experiment:
Figure 3: Insert markers menu
You can insert a marker simply by selecting it and clicking the 'Insert selected markers' button.


