Difference between revisions of "Mounting a Webdav File System"
| Line 47: | Line 47: | ||
After installing the software configure your webdav drive as shown in the image. Ather this you can use the taskbar icon for viewing the log and mounting the drive. | After installing the software configure your webdav drive as shown in the image. Ather this you can use the taskbar icon for viewing the log and mounting the drive. | ||
| − | [[File:Ks2 mount.png|frame| | + | [[File:Ks2 mount.png|frame|none|KS<sup>2</sup> configure]] |
= Mac OSX = | = Mac OSX = | ||
Revision as of 14:17, 19 April 2021
Quite often we will give a researcher access to some resource by giving a webdav enabled url, a username and password. This page describes how to use this url. In the remainder of this page we will assume that you were given the url https://exp.socsci.ru.nl/experiment/webdav.php, the username u123456 and the password PASSWORD.
The resource can be anything. It can be simply a folder for shared data, or it can be a web experiment accessible via another (non webdav) url.
Webbrowser
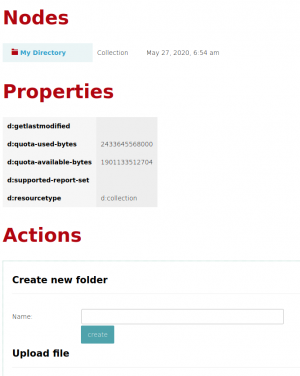
To use the url in a webbrowser, just open the url and type username and password in the popup dialog.
The page show is a SabreDav web page that will give you a limited number of features (create new folder, upload file, ...).
Linux
In Linux (and other POSIX compliant operating systems) you can connect a local directory (~/experiment in this example) to the Webdav resource (replace USER with your username):
 sudo apt install davfs2 # no need to allow non root users (setuid root)
 mkdir ~/experiment
 sudo mount.davfs https://exp.socsci.ru.nl/experiment/webdav.php ~/experiment -o rw,uid=USER,gid=USER
If you want to mount this resource each time you boot your computer, put the following in /etc/fstab (replacing USER with your username)
https://exp.socsci.ru.nl/experiment/webdav.php /home/USER/experiment davfs _netdev,noauto,user,uid=USER,gid=USER 0 0
and put the password in /etc/davfs2/secrets using:
/home/USER/experiment u123456 PASSWORD
Nautilus
Type ctrl-L to open the address bar. Type the address: davs://u123456@exp.socsci.ru.nl/experiment/webdav.php. A popup will appear for the password.
Dolphin
Click the address bar. Type the address: webdavs://u123456@exp.socsci.ru.nl/experiment/webdav.php. A popup will appear for the password.
Microsoft Windows
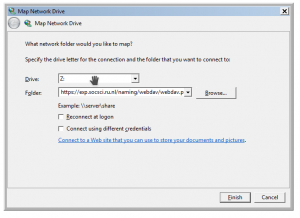
One can use the Microsoft Windows Map Network Drive feature to assign a drive letter. No special Windows program is needed to do this. It is an operating system feature. Note that there are quite a few issues. If you use Microsoft Windows it is usually a better idea to use an external program for accessing a webdav drive. Among other things, if the mount is not in the root directory of the server (http://example.com/mydir) but at a deeper level (http://example.com/superdir/mydir) using the microsoft operating system feature will probably not work.
Cyberduck
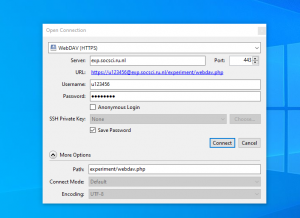
If you use Microsoft windows, Cyberduck is the most popular way to mount a webdav resource. See the image for how to enter information about the mount.
KS2 drive
If you want data to be synchronized automatically you can use KS2 drive. It is the same program that Utrecht university calls Yoda drive and for which the Donders Institute has an intranet page. It integrates nicely with the classical Windows system with drive letters.
If you do not have administrative privileges on your computer, please install the portable version of the software. Just unzip it somewhere convenient.
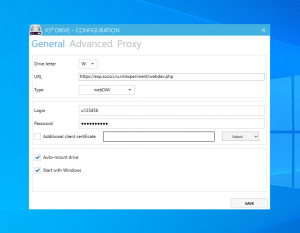
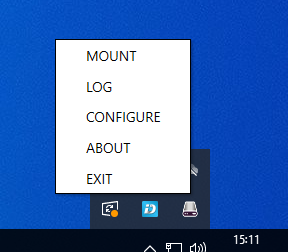
After installing the software configure your webdav drive as shown in the image. Ather this you can use the taskbar icon for viewing the log and mounting the drive.
Mac OSX
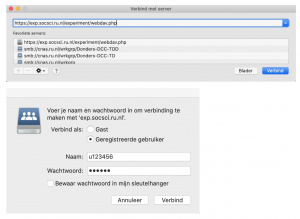
Use the finder "Connect to Server" option (cmd-k) to mount to the webdav file folder. For the server address use: https://exp.socsci.ru.nl/experiment/webdav.php and replace "experiment" with the name of your experiment folder. Press the connect button and login as a registered user with your u-number or s-number. If you want to use OSX finder please ask TSG to enable file locking, otherwise resouces will be mounted read only.
Alternatively Cyberduck (see Windows) also works for OSX.
