Difference between revisions of "Mounting a Webdav File System"
Wiki-admin (talk | contribs) m |
Wiki-admin (talk | contribs) m |
||
| Line 39: | Line 39: | ||
= Mac OSX = | = Mac OSX = | ||
| − | Use the finder "Connect to Server" option (cmd-k) to mount to the webdav file folder. For the server address use: https://exp.socsci.ru.nl/experiment/webdav.php and replace "experiment" with the name of your experiment folder. Press the connect button | + | Use the finder "Connect to Server" option (cmd-k) to mount to the webdav file folder. For the server address use: https://exp.socsci.ru.nl/experiment/webdav.php and replace "experiment" with the name of your experiment folder. Press the connect button and login as a registered user with your u-number or s-number. |
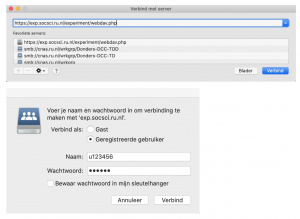
| − | + | [[File:Finder connecttoserver login.jpg|thumb|Mapping a network drive in OSX using Finder]] | |
= References = | = References = | ||
https://en.wikipedia.org/wiki/SabreDAV | https://en.wikipedia.org/wiki/SabreDAV | ||
Revision as of 09:01, 19 April 2021
Quite often we will give a researcher access to some resource by giving a webdav enabled url, a username and password. This page describes how to use this url. In the remainder of this page we will assume that you were given the url https://exp.socsci.ru.nl/experiment/webdav.php, the username u123456 and the password PASSWORD.
The resource can be anything. It can be simply a folder for shared data, or it can be a web experiment accessible via another (non webdav) url.
Webbrowser
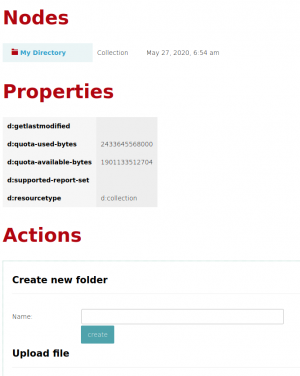
To use the url in a webbrowser, just open the url and type username and password in the popup dialog.
The page show is a SabreDav web page that will give you a limited number of features (create new folder, upload file, ...).
Linux
In Linux (and other POSIX compliant operating systems) you can connect a local directory (~/experiment in this example) to the Webdav resource (replace USER with your username):
 sudo apt install davfs2 # no need to allow non root users (setuid root)
 mkdir ~/experiment
 sudo mount.davfs https://exp.socsci.ru.nl/experiment/webdav.php ~/experiment -o rw,uid=USER,gid=USER
If you want to mount this resource each time you boot your computer, put the following in /etc/fstab (replacing USER with your username)
https://exp.socsci.ru.nl/experiment/webdav.php /home/USER/experiment davfs _netdev,noauto,user,uid=USER,gid=USER 0 0
and put the password in /etc/davfs2/secrets using:
/home/USER/experiment u123456 PASSWORD
Nautilus
Type ctrl-L to open the address bar. Type the address: davs://u123456@exp.socsci.ru.nl/experiment/webdav.php. A popup will appear for the password.
Dolphin
Click the address bar. Type the address: webdavs://u123456@exp.socsci.ru.nl/experiment/webdav.php. A popup will appear for the password.
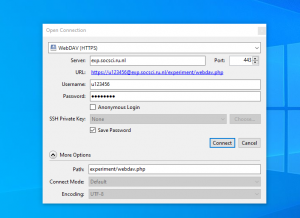
Cyberduck
If you use Microsoft windows, Cyberduck is probably the best choice for mounting a webdav resource. See the image for how to enter information about the mount.
Microsoft Windows
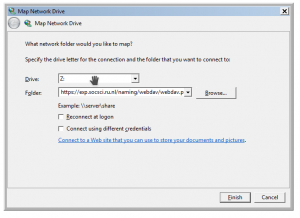
One can use the Microsoft Windows """Map Network Drive""" feature to assign a drive letter. No special Windows program is needed to do this. It is an operating system feature. Note that there are quite a few issues. If you use Microsoft Windows it is usually a better idea to use an external program for accessing a webdav drive. Among other things, if the mount is not in the root directory of the server (http://example.com/mydir) but at a deeper level (http://example.com/superdir/mydir) using the microsoft operating system feature will probably not work.
Mac OSX
Use the finder "Connect to Server" option (cmd-k) to mount to the webdav file folder. For the server address use: https://exp.socsci.ru.nl/experiment/webdav.php and replace "experiment" with the name of your experiment folder. Press the connect button and login as a registered user with your u-number or s-number.


