Difference between revisions of "Brainvision"
Wiki-admin (talk | contribs) |
Wiki-admin (talk | contribs) |
||
| Line 103: | Line 103: | ||
Click on the button "next", the following window appears on your screen: | Click on the button "next", the following window appears on your screen: | ||
| − | [[File: | + | [[File:screenshot amplifier settings.png]] |
| Line 139: | Line 139: | ||
Click on the button Next, the following window appears on your screen. | Click on the button Next, the following window appears on your screen. | ||
| − | [[File: | + | [[File:screenshot software filters.png]] |
Revision as of 08:16, 14 October 2014
Brainvision EEG
Electroencephalography is the neurophysiological measurement of electrical activity in the brain as recorded by electrodes placed on the scalp or, in special cases, subdurally or in the cerebral cortex. The resulting traces are known as an electroencephalogram (EEG) and represent a summation of post-synaptic potentials from a large number of neurons.
The use of EEG in neuroscience research delivers a number of benefits. One is that EEG is non-invasive for the research subject. Furthermore, the need to restrict the subject‘s movements is clearly lower than in other fields of neuroscience such as functional magnetic resonance imaging (fMRI). A further benefit is that many EEG applications record spontaneous brain activity, which means that the subject does not need to be able to cooperate with the researcher (as is necessary, for instance, during behavioral testing in neuropsychology). Also, EEGs have a high temporal resolution compared with techniques such as fMRI and PET and are capable of detecting changes in electrical activity in the brain on a time scale in the millisecond region.
In conventional scalp EEG, the recording is obtained by applying electrodes to the scalp using a conductive gel or paste, usually after preparing the scalp area by light abrasion to reduce electrode-scalp impedance. Many systems typically use electrodes which are each attached to an individual wire. Some systems use caps in which electrodes are embedded. This latter method is particularly common when high-density arrays of electrodes are required.
In addition to internal artifacts such as those produced by blinking, there are many artifacts which originate from outside the patient. Movement by the patient generates huge artifacts. Sweating or changes in temperature may cause electrode drifts. Spikes can originate from a momentary change in impedance at a given electrode. Poor grounding of the EEG electrodes can cause significant 50 or 60 Hz artifacts arising from the power system‘s frequency.
Brain Products EEG amplifiers are equipped with a number of noise reduction techniques such as active noise cancellation and active electrodes. High common mode rejection as well as low amplifier noise ensure maximum data quality. Our huge product range includes a range of electrodes and caps with custom or standard montages as well as a variety of requisite accessories.
Software Documentation
Find the Brainvision analyzer manual here Media:BrainVision_Analyzer_UM.pdf
Find the Brainvision recorder manual here Media:BrainVision_Recorder_UM.pdf
Find the Brainvision macro cookbook manual here Media:Macro_Cookbook.pdf
Find the Brainvision RecView manual here Media:BrainVision_RecView_UM.pdf
Find the Brainvision Automation manual here Media:Automation_Reference_Manual.pdf
EEG Markers
Presentation
#TemplateINFO.pcl

output_port Oport = output_port_manager.get_port( 1 );

#TemplateSUBS.pcl

Oport.send_code(100);  #This is your marker code, range code 1-255
wait_interval(2);      #2ms delay for the code to be recorded by brainvision; 2ms->500hz sampling rate
Oport.send_code(0);    #Back to 0; now ready to send a new code
Python
#!/usr/bin/env python

# import the rusocsci.buttonbox module
from rusocsci import buttonbox

# make a buttonbox
bb = buttonbox.Buttonbox()

# wait for a single button press
bb.sendMarker(100)    #This is your marker code, range code 1-255
core.wait(0.002)      #2ms delay for the code to be recorded by brainvision; 2ms->500hz sampling rate
bb.sendMarker(0)      #Back to 0; now ready to send a new code
BrainVision Recorder - Default Workspace
Audience:
All BrainVision Recorder users
Description
To make sure all data acquired at the DCC can be utilized for extensive analysis, default settings (sample rate, filters and such) are recommended for all EEG experiments. These settings have to be specified in the Workspace of the BrainVision Recorder package (screenshots of the BrainVision Recorder program are used below to illustrate how one can enter the settings correctly into the workspace).
Download workspace BrainVision Recorder
Links and Documentation For the standard 32 and 64 electrode setup, workspaces are available here.
Find the Brainvision analyzer manual here Media:actiCAP 32 Channel_default.zip
Find the Brainvision analyzer manual here Media:actiCAP 64 Channel_default.zip
Please check the BrainVision Recorder manual (English / German) for more in depth details.
Defining a workspace in BrainVision Recorder
The default settings required for EEG experiments have to be specified in the Workspace of the BrainVision Recorder package. This can be done as follows. Make a copy with a new name of an existing workspace file. Default 32 and 64 channel workspace files can be found on the data drive, D:\Workfiles\.
- Open the BrainVision Recorder package on the EEG computer in the lab of your choice by double clicking on the icon.
- Go to File / Open Workspace and open your workspace file.
- Go to File / Edit Workspace.
- The following window will appear on the computer screen:
In this window one defines the directory to which the raw datafiles have to be written. Always choose D:\Raw Files\<your name>\....
You can also use the option Automatic Filename Generation if you wish to have the names of your raw data files to be automatically generated.
Please note that your workspace may contain valuable information about your EEG-configuration.
Always keep a copy of the workspace file with your raw data! Never leave your data on the EEG-PC. Always copy data immediately after your experiment to your network drive.
Every two weeks your data will be erased automatically.
Good practice directly after your experiment:
- Ensure you have a copy of your workspace file
- Copy your data to your network drive or an external harddrive
- Make an archive-copy of your raw data files according to the archiving policy in your PI-group.
- Delete your data files from the local disk of the EEG-PC. Files will be erased automatically!
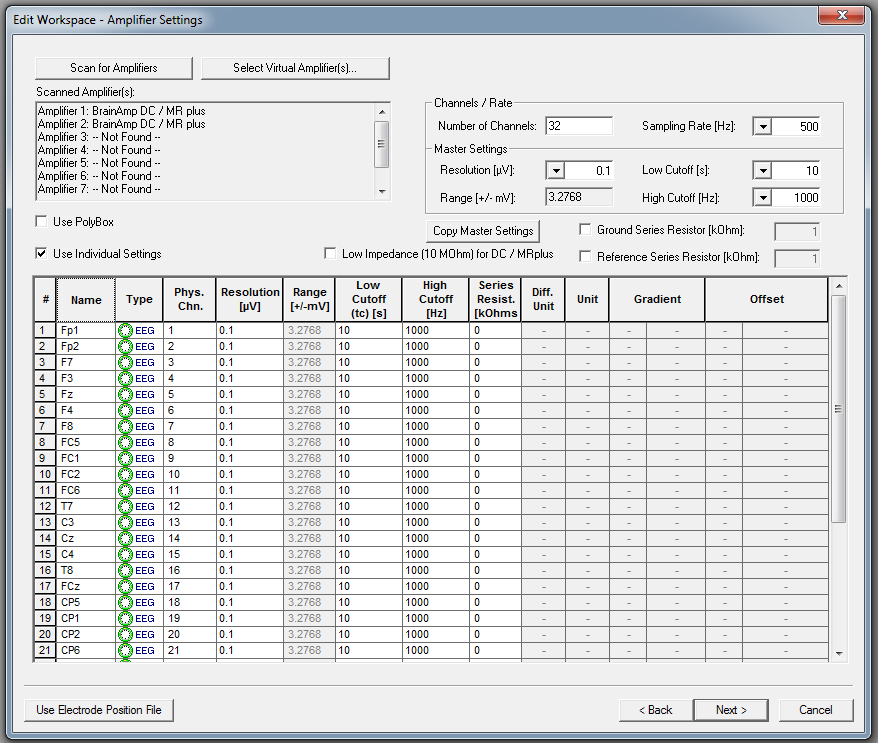
AMPLIFIER SETTINGS:
Click on the button "next", the following window appears on your screen:
First press "Scan for Amplifiers". BrainVision Recorder will give an overview of the amplifiers the software is communicating with.
The following default DCC settings are recommended for all channels.
| Setting | Default |
| Nr. of channels to be used | [] |
| Sampling rate (=downsampling filter) | 500Hz |
| Resolution | 0.1 μV |
| Low Cutoff | 10 s (frequency 0.016 Hz) |
| High Cutoff (= anti-aliasing filter) | 1000 Hz |
| Low impedance | Switched OFF. |
| Use individual settings | Only use this option to specify the electrode names of the electrode arrangement of your choice. |
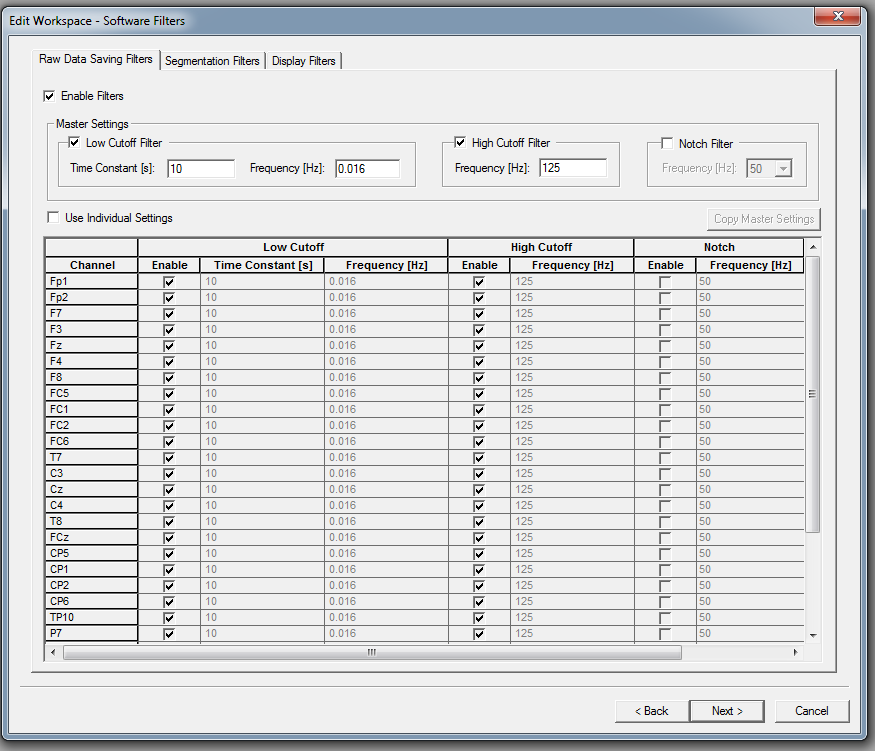
SOFTWARE FILTERS:
Click on the button Next, the following window appears on your screen.
PLEASE NOTE THAT THIS CARD HAS THREE TABS!
TAB1: "Raw data saving filters"
The following default settings are recommended for all channels:
| Setting | Default DCC settings |
| Enable filters | Switched ON |
| Low Cutoff Filter | 10s (frequency 0.016 Hz) |
| High Cutoff Filter | 125 Hz |
| Notch Filter | Switched OFF |
| Use Individual Settings | Switched OFF |
Note 1:
Sampling of the EEG is done by the amplifier with 5000Hz fixed and either 1000Hz anti aliasing filter (normal) or 250Hz anti aliasing filter (MRI only!). Downsampling can be done realtime on the computer to 200, 250, 500, 1000, 2500 or 5000. An appropriate anti-aliasing filter should be selected for that as well, depending on the downsampling frequency. At the default sampling rate of 500Hz, use a cutoff frequency of 200Hz.
Note 2:
Skin impedance should be kept low, e.g. below 3kΩ. We are currently looking into the possibility of running experiments with high skin impedance.
TAB2: "Segmentation filters"
Click on the tab "Segmentation Filters", the following window appears on your screen.
On this page filters can be specified for all data that is segmented/averaged online.
Since we recommend to collect all data in the continuous mode, these filters do not have to be specified and the "Enable Filters" option should be switched off.
TAB 3: "Display filters"
Click on the tab "Display Filters", the following window appears on your screen.
These filters are only set for display.
It is recommended to set the filters in exactly the same way as the "Raw Data Saving Filters" so that you see is what you get.
Thus, the following default settings are recommended:
| Setting | Default |
| Enable filters | Switched ON |
| Low Cutoff Filter | 10s (frequency 0.016 Hz) |
| High Cutoff Filter | 125 Hz |
| Notch Filter | Switched OFF |
| Use Individual Settings | Switched OFF |
SEGMENTATION / AVERAGING:
Click on the button "next", the following window appears on your screen:
On this page settings can be specified for online segmentation/averaging of EEG data. Since we recommend to collect all data in the continuous mode, these settings do not have to be specified and the "Enable Filters" option should be switched off.
However, if one would like to see an average of their data on screen, just for display purposes, one can enter the settings here (and the filter specifications for the segmented data in the "Segmentation Filters" tab (described above)).
Please check the BrainVision Recorder manual (English / German) for more in depth details.


