(71 intermediate revisions by 5 users not shown) Line 1:
Line 1: === Logitech Attack 3 Controller ===
[[File:RedJoystick.jpg|thumb|200px|The Red Joystick]]
<nowiki> Attribute VB_Name = "Module1"
There are two types of joystick available for our social sciences researchers:
'Dieser Source stammt von http://www.vb-fun.de
:🕹️ [[#Red Joystick|TSG Red Joystick]], a custom built, unimaginatively named, single -axis joystick with a bright red base .
'und kann frei verwendet werden. Für eventuelle Schäden
:🕹️ [[#Logitech Attack 3|Logitech Attack 3]], a commercial multi-axis joystick controller .
'wird nicht gehaftet.
'Um Fehler oder Fragen zu klären, nutzen Sie bitte unser Forum.
'Ansonsten viel Spaß und Erfolg mit diesem Source !
Option Explicit
== Red Joystick ==
Dim DX As New DirectX7
=== Installation ===
Dim DI As DirectInput
The Red Joystick is a [[wikipedia :plug and play|plug and play]] USB device .
Dim diJoystick() As DirectInputDevice
Const JOYSTICKCENTERED = 32768
Dim JSButton() As Single
Dim Button() As Long
Public test
Public jpos As Integer
Public Const UNKLAR = 99
Public Const MITTE = 0
Public Const WEG = 1
Public Const HIN = 2
Public Const GANZ_WEG = 3
Public Const GANZ_HIN = 4
Public Const ANSCHLAG_WEG = 5
Public Const ANSCHLAG_HIN = 6
Public Const WEITER_HIN = 7
Public Const WEITER_WEG = 8
Public jsknopf As Boolean
Public m1, m2, v1, v2, v3, h1, h2, h3
'
Public Declare Function ShowCursor Lib "user32" (ByVal bShow As Long) As Long
'
Public Function DInput_Init() As Boolean
Dim Caps As DIDEVCAPS
Dim diEnumObjects As DirectInputEnumDeviceObjects
Dim enumDevice As DirectInputEnumDevices
Dim i As Single
On Error GoTo ErrEnd
'erstelle das DirectInput-Objekt
Set DI = DX.DirectInputCreate()
'Auflistung aller angeschlossenen Joysticks einlesen
Set enumDevice = DI.GetDIEnumDevices(DIDEVTYPE_JOYSTICK, DIEDFL_ATTACHEDONLY)
If enumDevice.GetCount = 0 Then
MsgBox "There are no Joysticks connected to this PC!", vbInformation
Exit Function
End If
ReDim diJoystick(enumDevice.GetCount) As DirectInputDevice
ReDim JSButton(enumDevice.GetCount) As Single
'und nun pro Joystick
For i = 1 To enumDevice.GetCount
'setze Input-Objekt pro Joystick
Set diJoystick(i) = DI.CreateDevice(enumDevice.GetItem(i).GetGuidInstance)
'hole Produktname
Jsbilder.List2.AddItem enumDevice.GetItem(i).GetProductName
'setze DirectInput DatenFormat auf Joystick
diJoystick(i).SetCommonDataFormat DIFORMAT_JOYSTICK
'setze cooperative Level
diJoystick(i).SetCooperativeLevel Jsbilder.hWnd, DISCL_BACKGROUND Or DISCL_EXCLUSIVE
'hole Fähigkeiten des Joysticks
diJoystick(i).GetCapabilities Caps
'irgendwelche Fähigkeiten hat der Joystick hoffentlich
If Caps.lFlags Then
'hole Button-Auflistung vom Joystick
Set diEnumObjects = diJoystick(i).GetDeviceObjectsEnum(DIDFT_BUTTON)
'wieviele Button hat der Joystick
JSButton(i) = diEnumObjects.GetCount
ReDim Button(i, diEnumObjects.GetCount)
diJoystick(i).Acquire
diJoystick(i).Poll
Set diEnumObjects = Nothing
End If
Next i
DInput_Init = True
Exit Function
ErrEnd:
MsgBox "Direct Input konnte nicht initialisiert werden!" & vbCr & _
"Anwendung wird beendet.", vbExclamation
DInput_Init = False
End Function
Public Function CheckInput() As Integer
=== Configuration ===
Dim JoystickState As DIJOYSTATE
Dim i As Single
Dim strhilf As String
Dim temp, jpv, j
'On Error Resume Next
j = 0
s1:
j = j + 1
'stelle Verbindung her
diJoystick(Jsbilder.List2.ListIndex + 1).Acquire
'mache Daten verfügbar
diJoystick(Jsbilder.List2.ListIndex + 1).Poll
'hole aktuelle Daten
diJoystick(Jsbilder.List2.ListIndex + 1).GetDeviceState Len(JoystickState), JoystickState
'frmMain.txt_XY.Text = "X: " & (JoystickState.x - JOYSTICKCENTERED) & vbCrLf & _
' "Y: " & (JoystickState.y - JOYSTICKCENTERED) & vbCrLf & _
' "Z: " & (JoystickState.z - JOYSTICKCENTERED)
temp = 32768 - Val(JoystickState.y - JOYSTICKCENTERED)
When connected to a PC via USB , the Red Joystick will emulate a serial port . The following COM port settings should be used :
jpos = UNKLAR
If temp > m1 And temp < m2 Then jpos = MITTE
'
If temp < m1 And temp > v1 Then jpos = HIN
If temp > v2 And temp < v1 Then jpos = WEITER_HIN
If temp > v3 And temp < v2 Then jpos = GANZ_HIN
If temp < v3 Then jpos = ANSCHLAG_HIN
'
If temp > m2 And temp < h1 Then jpos = WEG
If temp > h1 And temp < h2 Then jpos = WEITER_WEG
If temp > h2 And temp < h3 Then jpos = GANZ_WEG
If temp > h3 Then jpos = ANSCHLAG_WEG
'
If JoystickState.buttons(0) > 0 Then jsknopf = True Else jsknopf = False
'stelle Verbindung her
diJoystick(Jsbilder.List2.ListIndex + 1).Acquire
'mache Daten verfügbar
diJoystick(Jsbilder.List2.ListIndex + 1).Poll
'hole aktuelle Daten
diJoystick(Jsbilder.List2.ListIndex + 1).GetDeviceState Len(JoystickState), JoystickState
'frmMain.txt_XY.Text = "X: " & (JoystickState.x - JOYSTICKCENTERED) & vbCrLf & _
' "Y: " & (JoystickState.y - JOYSTICKCENTERED) & vbCrLf & _
' "Z: " & (JoystickState.z - JOYSTICKCENTERED)
temp = 32768 - Val(JoystickState.y - JOYSTICKCENTERED)
jpv = UNKLAR
'
If temp > m1 And temp < m2 Then jpv = MITTE
'
If temp < m1 And temp > v1 Then jpv = HIN
If temp > v2 And temp < v1 Then jpv = WEITER_HIN
If temp > v3 And temp < v2 Then jpv = GANZ_HIN
If temp < v3 Then jpv = ANSCHLAG_HIN
'
If temp > m2 And temp < h1 Then jpv = WEG
If temp > h1 And temp < h2 Then jpv = WEITER_WEG
If temp > h2 And temp < h3 Then jpv = GANZ_WEG
If temp > h3 Then jpv = ANSCHLAG_WEG
If jpos <> jpv Then jpos = UNKLAR
If jpos = UNKLAR Then
If j < 10 Then GoTo s1
End If
'
If test Then
Jsbilder.Label2.Visible = True
If jpos = UNKLAR Then Jsbilder.Label2.Caption = "UNKLAR " + CStr(temp)
If jpos = MITTE Then Jsbilder.Label2.Caption = "MITTE " + CStr(temp)
If jpos = WEG Then Jsbilder.Label2.Caption = "WEG " + CStr(temp)
If jpos = GANZ_WEG Then Jsbilder.Label2.Caption = "GANZ_WEG " + CStr(temp)
If jpos = ANSCHLAG_WEG Then Jsbilder.Label2.Caption = "ANSCHLAG_WEG " + CStr(temp)
If jpos = HIN Then Jsbilder.Label2.Caption = "HIN " + CStr(temp)
If jpos = GANZ_HIN Then Jsbilder.Label2.Caption = "GANZ_HIN " + CStr(temp)
If jpos = ANSCHLAG_HIN Then Jsbilder.Label2.Caption = "ANSCHLAG_HIN " + CStr(temp)
If jpos = WEITER_WEG Then Jsbilder.Label2.Caption = "WEITER_WEG " + CStr(temp)
If jpos = WEITER_HIN Then Jsbilder.Label2.Caption = "WEITER_HIN " + CStr(temp)
End If
CheckInput = jpos
End Function
Public Sub DInput_ControlPanel()
{| class="wikitable"
'öffne Systemsteuerung
|-
DI.RunControlPanel Jsbilder.hWnd
| Baudrate
End Sub
| 115200
|-
| Parity
| None
|-
| Data bits
| 8
|-
| Stop bits
| 1
|-
| Flow control
| None
|-
| CTS Control
| Off
|-
| DSR Out Control
| Off
|-
| DSR In Control
| Off
|-
| RTS Control
| Off
|-
| Set FIFO Interrupt
| Off
|}
Public Sub DInput_Kill()
===Presentation== =
Dim i As Single
'''Example PCL code you can program a handle to send a marker:'''
If Jsbilder.List2.ListCount > 0 Then
For i = 1 To Jsbilder.List2.ListCount
Set diJoystick(i) = Nothing
Next i
End If
Set DI = Nothing
Set DX = Nothing
End Sub</nowiki>
<nowiki> Type=Exe
active_buttons = 0;
Reference=*\G{00020430-0000-0000-C000-000000000046}#2.0#0#..\..\..\..\WINDOWS\system32\stdole2.tlb#OLE Automation
begin ;
Reference=*\G{E1211242-8E94-11D1-8808-00C04FC2C602}#1.0#0#..\..\..\..\WINDOWS\system32\dx7vb.dll#DirectX 7 for Visual Basic Type Library
picture {
Module=Module1; Module1.bas
text { caption = " "; font_size = 16; } t_Text1; x = 0; y = 0;
Form=js.frm
} P_Text;
Startup="Jsbilder"
begin_pcl;
HelpFile=""
joystick stick = response_manager.get_joystick( 1 );
ExeName32="jsbilder_zoom_englisch_181006.exe"
loop int i = 1
Command32=""
until false
Name="joystick_bilder"
begin
HelpContextID="0"
stick.poll( );
CompatibleMode="0"
t_Text1.set_caption("coordinates: " + string(stick.x()) + ": " + string(stick.y()), true);
MajorVer=1
P_Text.present ();
MinorVer=0
end;
RevisionVer=0
AutoIncrementVer=0
ServerSupportFiles=0
VersionCompanyName="TUD"
CompilationType=0
OptimizationType=0
FavorPentiumPro(tm)=0
CodeViewDebugInfo=0
NoAliasing=0
BoundsCheck=0
OverflowCheck=0
FlPointCheck=0
FDIVCheck=0
UnroundedFP=0
StartMode=0
Unattended=0
Retained=0
ThreadPerObject=0
MaxNumberOfThreads=1
[MS Transaction Server]
==== Python = ===
AutoRefresh=1</nowiki>
<syntaxhighlight lang="python" line > #!/usr/bin/env python
=== Red Joystick (Serial Based) ===
<nowiki> #!/usr/bin/env python
from rusocsci import joystick, utils
from rusocsci import joystick, utils
import logging, time
import logging, time
Line 238:
Line 81: for i in range(15):
for i in range(15):
print("x: {}".format(j.getX()))
print("x: {}".format(j.getX()))
time.sleep(1)</nowiki>
time.sleep(1)
</syntaxhighlight >
== Logitech Attack 3 ==
[[File:logitech_joystick.jpg|thumb|200px|Logitech Attack 3 Joystick]]
=== Installation ===
The Logitech Attack 3 joystick requires a DirectX 7 DLL file to be installed on your computer. If it hasn't been installed yet, please follow the instructions below.
==== Windows 7 32bit ====
# Download {{Download link|media=dx7dll.zip|dx7vb.dll|zip}}.
# Extract the zip and copy the .dll file into the following folder: '''<tt>C:\Windows\System32</tt>'''
# Open the Windows Command Prompt with '''Administrator rights'''.
# Register the DLL file by executing the following command:<br /> <code style="background-color:#000; color:#fff; padding:1px 3px;">C:\Windows\System32\regsvr32 dx7vb.dll</code>
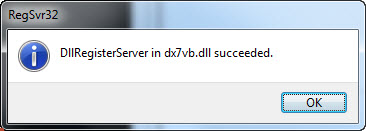
# When done correctly, you should see the following message:<br /><br />[[file:regsvr32.jpg]]
<br />
==== Windows 7 64bit and Windows 10 64bit ====
# Download {{Download link|media=dx7dll.zip|dx7vb.dll|zip}}.
# Extract the zip and copy the .dll file into the following folder: '''<tt>C:\Windows\SysWow64</tt>'''
# Open the Windows Command Prompt with '''Administrator rights'''.
# Register the DLL file by executing the following command:<br /> <code style="background-color:#000; color:#fff; padding:1px 3px;">C:\Windows\SysWow64\regsvr32 dx7vb.dll</code>
# When done correctly, you should see the following message:<br /><br />[[file:regsvr32.jpg]]
The Red Joystick There are two types of joystick available for our social sciences researchers:
🕹️ TSG Red Joystick , a custom built, unimaginatively named, single-axis joystick with a bright red base.
🕹️ Logitech Attack 3 , a commercial multi-axis joystick controller.
Red Joystick Installation The Red Joystick is a plug and play USB device.
Configuration When connected to a PC via USB, the Red Joystick will emulate a serial port. The following COM port settings should be used:
Baudrate
115200
Parity
None
Data bits
8
Stop bits
1
Flow control
None
CTS Control
Off
DSR Out Control
Off
DSR In Control
Off
RTS Control
Off
Set FIFO Interrupt
Off
Presentation Example PCL code you can program a handle to send a marker:
active_buttons = 0;
begin;
picture {
  text { caption = " "; font_size = 16; } t_Text1; x = 0; y = 0;
} P_Text;
begin_pcl;
joystick stick = response_manager.get_joystick( 1 );
loop int i = 1
until false
begin
	stick.poll( );
	t_Text1.set_caption("coordinates: " + string(stick.x()) + ":" + string(stick.y()), true);
	P_Text.present();
end;
Python #!/usr/bin/env python
from rusocsci import joystick , utils
import logging , time
## Setup Section
#logging.getLogger().setLevel(logging.DEBUG) # use this for debug info
#utils.serialList() # get alist of ports with a joystick or buttonbox connected
j = joystick . Joystick ()
#j = joystick.Joystick(1) # use this to connect to the second joystick
#j = joystick.Joystick(port="COM1") # use this to connect to a joystick on a specific port
## Experiment Section
for i in range ( 15 ):
print ( "x: {} " . format ( j . getX ()))
time . sleep ( 1 )
Logitech Attack 3 Logitech Attack 3 Joystick Installation The Logitech Attack 3 joystick requires a DirectX 7 DLL file to be installed on your computer. If it hasn't been installed yet, please follow the instructions below.
Windows 7 32bit Download ⬇️dx7vb.dll (zip).
Extract the zip and copy the .dll file into the following folder: C:\Windows\System32
Open the Windows Command Prompt with Administrator rights .
Register the DLL file by executing the following command:C:\Windows\System32\regsvr32 dx7vb.dll
When done correctly, you should see the following message:
Windows 7 64bit and Windows 10 64bit Download ⬇️dx7vb.dll (zip).
Extract the zip and copy the .dll file into the following folder: C:\Windows\SysWow64
Open the Windows Command Prompt with Administrator rights .
Register the DLL file by executing the following command:C:\Windows\SysWow64\regsvr32 dx7vb.dll
When done correctly, you should see the following message: