JoyStick: Difference between revisions
Jump to navigation
Jump to search
Created page with "=== Logitech Attack 3 Controller === === Red Joystick (Serial Based) ===" |
|||
| (78 intermediate revisions by 5 users not shown) | |||
| Line 1: | Line 1: | ||
[[File:RedJoystick.jpg|thumb|200px|The Red Joystick]] | |||
=== Red Joystick ( | There are two types of joystick available for our social sciences researchers: | ||
:🕹️ [[#Red Joystick|TSG Red Joystick]], a custom built, unimaginatively named, single-axis joystick with a bright red base. | |||
:🕹️ [[#Logitech Attack 3|Logitech Attack 3]], a commercial multi-axis joystick controller. | |||
== Red Joystick == | |||
=== Installation === | |||
The Red Joystick is a [[wikipedia:plug and play|plug and play]] USB device. | |||
=== Configuration === | |||
When connected to a PC via USB, the Red Joystick will emulate a serial port. The following COM port settings should be used: | |||
{| class="wikitable" | |||
|- | |||
| Baudrate | |||
| 115200 | |||
|- | |||
| Parity | |||
| None | |||
|- | |||
| Data bits | |||
| 8 | |||
|- | |||
| Stop bits | |||
| 1 | |||
|- | |||
| Flow control | |||
| None | |||
|- | |||
| CTS Control | |||
| Off | |||
|- | |||
| DSR Out Control | |||
| Off | |||
|- | |||
| DSR In Control | |||
| Off | |||
|- | |||
| RTS Control | |||
| Off | |||
|- | |||
| Set FIFO Interrupt | |||
| Off | |||
|} | |||
===Presentation=== | |||
'''Example PCL code you can program a handle to send a marker:''' | |||
active_buttons = 0; | |||
begin; | |||
picture { | |||
text { caption = " "; font_size = 16; } t_Text1; x = 0; y = 0; | |||
} P_Text; | |||
begin_pcl; | |||
joystick stick = response_manager.get_joystick( 1 ); | |||
loop int i = 1 | |||
until false | |||
begin | |||
stick.poll( ); | |||
t_Text1.set_caption("coordinates: " + string(stick.x()) + ":" + string(stick.y()), true); | |||
P_Text.present(); | |||
end; | |||
==== Python ==== | |||
<syntaxhighlight lang="python" line> #!/usr/bin/env python | |||
from rusocsci import joystick, utils | |||
import logging, time | |||
## Setup Section | |||
#logging.getLogger().setLevel(logging.DEBUG) # use this for debug info | |||
#utils.serialList() # get alist of ports with a joystick or buttonbox connected | |||
j = joystick.Joystick() | |||
#j = joystick.Joystick(1) # use this to connect to the second joystick | |||
#j = joystick.Joystick(port="COM1") # use this to connect to a joystick on a specific port | |||
## Experiment Section | |||
for i in range(15): | |||
print("x: {}".format(j.getX())) | |||
time.sleep(1) | |||
</syntaxhighlight> | |||
== Logitech Attack 3 == | |||
[[File:logitech_joystick.jpg|thumb|200px|Logitech Attack 3 Joystick]] | |||
=== Installation === | |||
The Logitech Attack 3 joystick requires a DirectX 7 DLL file to be installed on your computer. If it hasn't been installed yet, please follow the instructions below. | |||
==== Windows 7 32bit ==== | |||
# Download {{Download link|media=dx7dll.zip|dx7vb.dll|zip}}. | |||
# Extract the zip and copy the .dll file into the following folder: '''<tt>C:\Windows\System32</tt>''' | |||
# Open the Windows Command Prompt with '''Administrator rights'''. | |||
# Register the DLL file by executing the following command:<br /> <code style="background-color:#000; color:#fff; padding:1px 3px;">C:\Windows\System32\regsvr32 dx7vb.dll</code> | |||
# When done correctly, you should see the following message:<br /><br />[[file:regsvr32.jpg]] | |||
<br /> | |||
==== Windows 7 64bit and Windows 10 64bit ==== | |||
# Download {{Download link|media=dx7dll.zip|dx7vb.dll|zip}}. | |||
# Extract the zip and copy the .dll file into the following folder: '''<tt>C:\Windows\SysWow64</tt>''' | |||
# Open the Windows Command Prompt with '''Administrator rights'''. | |||
# Register the DLL file by executing the following command:<br /> <code style="background-color:#000; color:#fff; padding:1px 3px;">C:\Windows\SysWow64\regsvr32 dx7vb.dll</code> | |||
# When done correctly, you should see the following message:<br /><br />[[file:regsvr32.jpg]] | |||
Latest revision as of 09:44, 10 August 2026

There are two types of joystick available for our social sciences researchers:
- 🕹️ TSG Red Joystick, a custom built, unimaginatively named, single-axis joystick with a bright red base.
- 🕹️ Logitech Attack 3, a commercial multi-axis joystick controller.
Red Joystick
Installation
The Red Joystick is a plug and play USB device.
Configuration
When connected to a PC via USB, the Red Joystick will emulate a serial port. The following COM port settings should be used:
| Baudrate | 115200 |
| Parity | None |
| Data bits | 8 |
| Stop bits | 1 |
| Flow control | None |
| CTS Control | Off |
| DSR Out Control | Off |
| DSR In Control | Off |
| RTS Control | Off |
| Set FIFO Interrupt | Off |
Presentation
Example PCL code you can program a handle to send a marker:
active_buttons = 0;
begin;
picture {
  text { caption = " "; font_size = 16; } t_Text1; x = 0; y = 0;
} P_Text;
begin_pcl;
joystick stick = response_manager.get_joystick( 1 );
loop int i = 1
until false
begin
	stick.poll( );
	t_Text1.set_caption("coordinates: " + string(stick.x()) + ":" + string(stick.y()), true);
	P_Text.present();
end;
Python
 #!/usr/bin/env python
 from rusocsci import joystick, utils
 import logging, time

 ## Setup Section
 #logging.getLogger().setLevel(logging.DEBUG) # use this for debug info
 #utils.serialList() # get alist of ports with a joystick or buttonbox connected
 j = joystick.Joystick()
 #j = joystick.Joystick(1) # use this to connect to the second joystick
 #j = joystick.Joystick(port="COM1") # use this to connect to a joystick on a specific port

 ## Experiment Section
 for i in range(15):
 print("x: {}".format(j.getX()))
 time.sleep(1)
Logitech Attack 3

Installation
The Logitech Attack 3 joystick requires a DirectX 7 DLL file to be installed on your computer. If it hasn't been installed yet, please follow the instructions below.
Windows 7 32bit
- Download ⬇️dx7vb.dll (zip).
- Extract the zip and copy the .dll file into the following folder: C:\Windows\System32
- Open the Windows Command Prompt with Administrator rights.
- Register the DLL file by executing the following command:
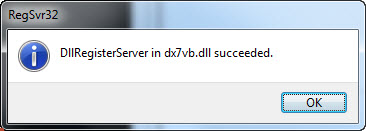
C:\Windows\System32\regsvr32 dx7vb.dll - When done correctly, you should see the following message:

Windows 7 64bit and Windows 10 64bit
- Download ⬇️dx7vb.dll (zip).
- Extract the zip and copy the .dll file into the following folder: C:\Windows\SysWow64
- Open the Windows Command Prompt with Administrator rights.
- Register the DLL file by executing the following command:
C:\Windows\SysWow64\regsvr32 dx7vb.dll - When done correctly, you should see the following message: