Difference between revisions of "Screen Recording with OBS"
m |
|||
| Line 31: | Line 31: | ||
}} | }} | ||
| − | Open Broadcaster Software (OBS) Studio is a great, free program that lets you stream and/or record your entire desktop, a specific application window, or a combination of multiple sources. On this page we will discuss the basic settings for a single screen recording. | + | Open Broadcaster Software (OBS) Studio is a great, free program that lets you stream and/or record your entire desktop, a specific application window, a webcam, or a combination of multiple sources. On this page we will discuss the basic settings for a single screen recording. |
<!-- Table of Contents will be generated here --> | <!-- Table of Contents will be generated here --> | ||
| Line 42: | Line 42: | ||
When opening OBS Studio for the first time, you will see a large black canvas which is the preview window of what you are recording. By default, no source is selected so nothing is visible. Before setting up our source(s), let's make sure our canvas and recording settings are correct, otherwise we'd have to adjust the sources again later. Click the "Settings" button in the bottom right. | When opening OBS Studio for the first time, you will see a large black canvas which is the preview window of what you are recording. By default, no source is selected so nothing is visible. Before setting up our source(s), let's make sure our canvas and recording settings are correct, otherwise we'd have to adjust the sources again later. Click the "Settings" button in the bottom right. | ||
| + | ===Video Settings=== | ||
Go to the "Video" tab and adjust the resolution and frame rate to match your source and desired output. For recording, we advise to keep the Base Resolution and Output Resolution the same; we can always scale down the recorded video later. | Go to the "Video" tab and adjust the resolution and frame rate to match your source and desired output. For recording, we advise to keep the Base Resolution and Output Resolution the same; we can always scale down the recorded video later. | ||
[[File:Obs tut videoSet.png|thumb|none|500px|Typical resolution settings for recording on a Full HD monitor.]] | [[File:Obs tut videoSet.png|thumb|none|500px|Typical resolution settings for recording on a Full HD monitor.]] | ||
| + | ===Output Settings=== | ||
Next, go to the "Output" tab and then the "Recording" sub-tab. | Next, go to the "Output" tab and then the "Recording" sub-tab. | ||
*Select your default folder for saving the recordings to under "Recording Path". | *Select your default folder for saving the recordings to under "Recording Path". | ||
| − | *Set your recording format. | + | *Set your recording format. We recommend using MKV, because this format allows you to recover the video in case of a crash. See below how to automatically convert the file to MP4 after your recording, which is typically the format you want to use if you want to edit the video later. |
*Select your encoder. You'll probably want to use x264. | *Select your encoder. You'll probably want to use x264. | ||
*Set the Rate Control. CBR is best in most cases, because it ensures the video can be recorded and played back at a consistent bitrate, making it less likely to cause performance drops. The downside is a potentially larger file size. | *Set the Rate Control. CBR is best in most cases, because it ensures the video can be recorded and played back at a consistent bitrate, making it less likely to cause performance drops. The downside is a potentially larger file size. | ||
| Line 55: | Line 57: | ||
If audio is important to you, you can fiddle around with the settings in the "Audio" tabs, but for most cases the default settings will do. | If audio is important to you, you can fiddle around with the settings in the "Audio" tabs, but for most cases the default settings will do. | ||
Apply the new settings and close the settings window. | Apply the new settings and close the settings window. | ||
| + | |||
| + | ===Advanced Settings=== | ||
| + | If you have chosen MKV as your recording format, go to the "Advanced" tab to set OBS to automatically convert ("remux") your recording to MP4 format. This will happen as soon as you press the "Stop Recording" button. Remuxing means it only changes the container, not the codec, and so this will not degrade the video quality. | ||
| + | [[File:Obs tut advancedSet.png|thumb|none|500px|Set OBS to automatically remux the recording file to MP4]] | ||
| + | |||
===Sources=== | ===Sources=== | ||
| Line 60: | Line 67: | ||
[[File:Obs tut sourceSet.png|thumb|none|500px]] | [[File:Obs tut sourceSet.png|thumb|none|500px]] | ||
| + | ====Desktop Capture==== | ||
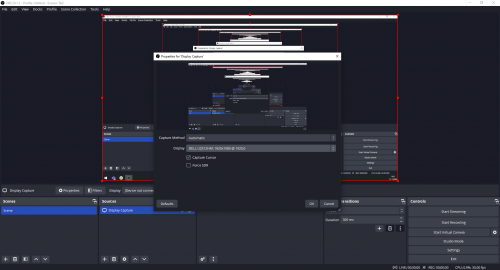
To capture your entire screen, select "Display Capture". If you have multiple displays connected, choose the display you wish to record. You can also choose whether to include the mouse cursor in your recording. Click OK when done. If your display resolution matches the canvas resolution we set earlier, you should see our Display Capture source fill the entire preview window. If not, you can drag the red corners of the window to scale it up or down to fill the screen or to position it wherever you want. | To capture your entire screen, select "Display Capture". If you have multiple displays connected, choose the display you wish to record. You can also choose whether to include the mouse cursor in your recording. Click OK when done. If your display resolution matches the canvas resolution we set earlier, you should see our Display Capture source fill the entire preview window. If not, you can drag the red corners of the window to scale it up or down to fill the screen or to position it wherever you want. | ||
[[File:Obs tut desktopCapture.png|thumb|none|500px]] | [[File:Obs tut desktopCapture.png|thumb|none|500px]] | ||
| + | |||
| + | ====Webcam==== | ||
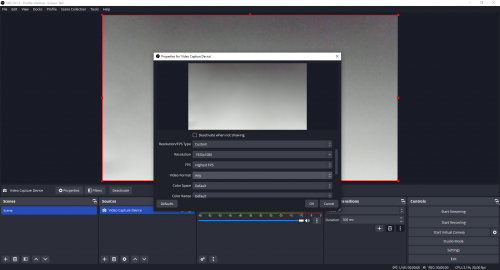
| + | To capture a webcam, select "Video Capture Device" form the Sources dropdown menu. From the "Device" dropdown menu, select your webcam. If you do not see your webcam listed, make sure it is connected and not used by another program. | ||
| + | Some webcams will default to a low resolution; you will notice this when the webcam image does not fill up the entire frame. To ensure your webcam is using the correct resolution, scroll down the device properties and set "Resolution/FPS Type" to "Custom". Then type the resolution (e.g. 1920x1080 for our Logitech C920/C922 webcams), and set the FPS (refresh rate) to "Highest FPS" for the most stable stream. | ||
| + | |||
| + | [[File:Obs webcam settings.png|thumb|none|500px|Video Capture Device settings for a Logitech BRIO webcam]] | ||
==Usage== | ==Usage== | ||
| − | |||
To start recording, click the "Start Recording" button in the bottom right. The button will change to "Stop Recording", which you can click again to stop recording. The recordings are stored in the folder you specified in the Output settings. | To start recording, click the "Start Recording" button in the bottom right. The button will change to "Stop Recording", which you can click again to stop recording. The recordings are stored in the folder you specified in the Output settings. | ||
==See Also== | ==See Also== | ||
*[[Video_Codecs|Video Codecs]] | *[[Video_Codecs|Video Codecs]] | ||
Revision as of 15:48, 11 July 2023
| Development status | Active | ||||
|---|---|---|---|---|---|
| Operating system | Microsoft Windows, Linux, OSX | ||||
| License | GNU GPLv2 | ||||
| Website | obsproject.com | ||||
| |||||
Open Broadcaster Software (OBS) Studio is a great, free program that lets you stream and/or record your entire desktop, a specific application window, a webcam, or a combination of multiple sources. On this page we will discuss the basic settings for a single screen recording.
Installation
Download and run the installer for your operating system from the OBS website.
Configuration
When opening OBS Studio for the first time, you will see a large black canvas which is the preview window of what you are recording. By default, no source is selected so nothing is visible. Before setting up our source(s), let's make sure our canvas and recording settings are correct, otherwise we'd have to adjust the sources again later. Click the "Settings" button in the bottom right.
Video Settings
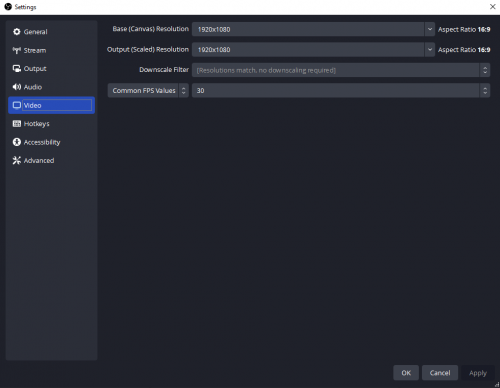
Go to the "Video" tab and adjust the resolution and frame rate to match your source and desired output. For recording, we advise to keep the Base Resolution and Output Resolution the same; we can always scale down the recorded video later.
Output Settings
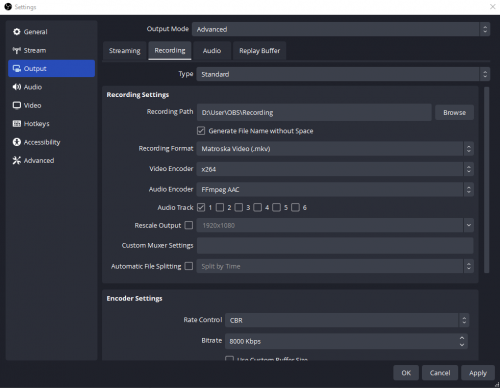
Next, go to the "Output" tab and then the "Recording" sub-tab.
- Select your default folder for saving the recordings to under "Recording Path".
- Set your recording format. We recommend using MKV, because this format allows you to recover the video in case of a crash. See below how to automatically convert the file to MP4 after your recording, which is typically the format you want to use if you want to edit the video later.
- Select your encoder. You'll probably want to use x264.
- Set the Rate Control. CBR is best in most cases, because it ensures the video can be recorded and played back at a consistent bitrate, making it less likely to cause performance drops. The downside is a potentially larger file size.
- Set your Bitrate. Check the Video Codecs page for more info on choosing your bitrate. In our example of a basic 1920x1080 screen recording, 8000Kbps usually gives a good balance between video quality and file size. If you have a lot of fast moving objects or fast changing colors to record, you might want to choose a higher bitrate. If your screen is largely static, or if you use a lower output resolution, you can opt for a lower bitrate to save space on your hard drive.
If audio is important to you, you can fiddle around with the settings in the "Audio" tabs, but for most cases the default settings will do. Apply the new settings and close the settings window.
Advanced Settings
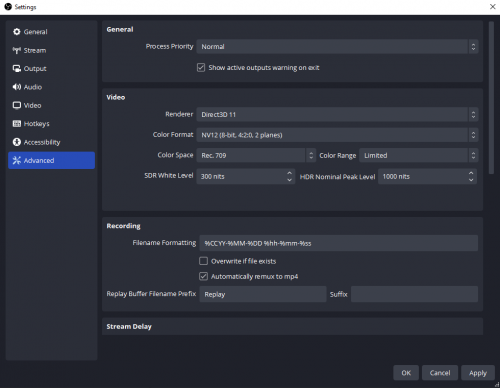
If you have chosen MKV as your recording format, go to the "Advanced" tab to set OBS to automatically convert ("remux") your recording to MP4 format. This will happen as soon as you press the "Stop Recording" button. Remuxing means it only changes the container, not the codec, and so this will not degrade the video quality.
Sources
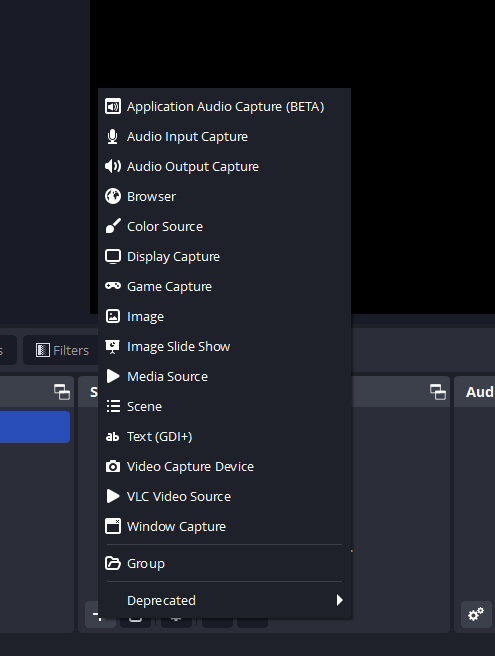
Now let's add a source for our recording. Click the plus icon underneath the "Sources" box at the bottom of the screen. A dropdown menu will appear in which you can select your source(s). OBS allows you to select multiple sources and place them on top of each other (picture in picture), side by side, or in any other configuration. In this guide, we will stick with a single source.
Desktop Capture
To capture your entire screen, select "Display Capture". If you have multiple displays connected, choose the display you wish to record. You can also choose whether to include the mouse cursor in your recording. Click OK when done. If your display resolution matches the canvas resolution we set earlier, you should see our Display Capture source fill the entire preview window. If not, you can drag the red corners of the window to scale it up or down to fill the screen or to position it wherever you want.
Webcam
To capture a webcam, select "Video Capture Device" form the Sources dropdown menu. From the "Device" dropdown menu, select your webcam. If you do not see your webcam listed, make sure it is connected and not used by another program. Some webcams will default to a low resolution; you will notice this when the webcam image does not fill up the entire frame. To ensure your webcam is using the correct resolution, scroll down the device properties and set "Resolution/FPS Type" to "Custom". Then type the resolution (e.g. 1920x1080 for our Logitech C920/C922 webcams), and set the FPS (refresh rate) to "Highest FPS" for the most stable stream.
Usage
To start recording, click the "Start Recording" button in the bottom right. The button will change to "Stop Recording", which you can click again to stop recording. The recordings are stored in the folder you specified in the Output settings.
